Welcome to The Hand Lettering Forum!
This is an interactive Bulletin Board on the topics of Sign making, design, fabrication, History, old Books and of coarse Letterheads, Keepers of the craft. The Hand Lettering Forum features links to resources, sign art history, techniques, and artists profiles. Learn more about Letterheads at https://theletterheads.com. Below you'll see Mchat has been added as a live communication portal for trial, and the Main forum Links are listed below.
This is an interactive Bulletin Board on the topics of Sign making, design, fabrication, History, old Books and of coarse Letterheads, Keepers of the craft. The Hand Lettering Forum features links to resources, sign art history, techniques, and artists profiles. Learn more about Letterheads at https://theletterheads.com. Below you'll see Mchat has been added as a live communication portal for trial, and the Main forum Links are listed below.
Glue (chip) prep
Moderators: Ron Percell, Mike Jackson, Danny Baronian
-
Robert Schwieger
- Posts: 123
- Joined: Wed Feb 07, 2007 12:38 pm
- Location: Nebraska
Glue (chip) prep
Just curious about the better course in preparing hide glue for glue chipping. Which is better? Using mocrowave, overheated or underheated without relying on thermometer. Currently allowing the glue to "bubble-up" but not over. Sometimes small particles remain. Is it worthwhile to continue short bursts of heat to dissolve the slight residue and risk "burn"? Thanks for your kind assistance. Bob
-
Larry White
- Posts: 1213
- Joined: Thu Apr 08, 2004 4:18 am
Hi Robert-
I've always followed Rick Glawson's instructions (from the letterheads website):
-Larry
I've always followed Rick Glawson's instructions (from the letterheads website):
Before I aquired a glue pot, I used the double boiler method and watched the temperature with a thermometer. I never heated the glue in the microwave. I don't do my gold size in the microwave either. I guess I like a bit more control over the situation than the microwave allows. Hope that helps.Using a 3 oz. Dixie cup as a gauge, take 1 cup of dry glue with 1½ cups of cool tap water for every approximate square foot of area to be chipped. Mix these together in your glue pot and cover with a plate or scrap of glass to prevent water evaporation. Allow to soak at least 30 minutes before any heat is applied. A double boiler works fine, but you will soon tire of the thermometer mess and upgrade to an electric glue pot. It’s important that the glue temperature does not go above 160 degrees or else the glue becomes cooked, rendering it useless. An electric pot has a built in rheostat to maintain the correct heat. The water to glue ratio of 1 1/2 to 1 is sufficient for most selective chipping. Remember that the more water you add, the more that has to evaporate before it can chip. Using less water in the mix (1 to 1) slows the glue flow and gels rapidly. This can cause difficulty in achieving an even glue layer, yet is invaluable when brush applying multiple thin coats to curved or cylindrical objects such as neon tubes or jars. On the other hand, when large solid areas are to be chipped (say 4 sq ft or larger) you want the gelling slowed down to level out evenly. Here we will use as much as a 2 to 1 ratio. It can take several hours to gel, but as long as you have the glass panel perfectly level, the glue thickness will be consistent.
-Larry
-
Kent Smith
- Posts: 569
- Joined: Fri Dec 31, 2004 6:41 pm
- Location: Estes Park, CO
- Contact:
nuke or not
Personal preferance...
I microwave for small projects and keep a pot going for larger projects. Net results seem to be the same.
I microwave for small projects and keep a pot going for larger projects. Net results seem to be the same.
-
Dale Feicke
- Posts: 10
- Joined: Fri Nov 23, 2007 11:07 am
- Location: Mississippi
-
Mike Jackson
- Site Admin
- Posts: 1705
- Joined: Tue Apr 06, 2004 11:02 pm
- Location: Jackson Hole, WY
- Contact:
Dale,
You might want to spend some (a lot) of time on this page:
http://www.theletterheads.com/lhparts/gluechip.html
It will give you just about all you need for getting started including names and addresses for the glue supplies.
Good luck,
Mike Jackson
You might want to spend some (a lot) of time on this page:
http://www.theletterheads.com/lhparts/gluechip.html
It will give you just about all you need for getting started including names and addresses for the glue supplies.
Good luck,
Mike Jackson
Mike Jackson / co-administrator
Golden Era Studios
Vintage Ornamental Clip art
Jackson Hole, WY
Photography site:
Teton Images
Jackson Hole photography blog:
Best of the Tetons
Golden Era Studios
Vintage Ornamental Clip art
Jackson Hole, WY
Photography site:
Teton Images
Jackson Hole photography blog:
Best of the Tetons
-
Patrick Mackle
- Posts: 478
- Joined: Thu Apr 08, 2004 10:21 am
- Location: Monrovia, Ca.
- Contact:
Carelessly heating the glue without a candy thermometer and without a jacketed container (double boiler) invites the chance of killing the pulling power of the glue- Seriously!
You can't stir the glue while it is in the microwave. If you are getting bubbles in the micro wave, even though it is not visibly boiling over, the area in the center being waved is being damaged and when poured out will mix around with the whole batch thus affecting and weakening your chipping.
Have you ever microwaved a burrito and then discover that it is hot on the outside and blistering hot inside?
It is better to underheat than overheat. The only reason for heating is to emulsify the mixture so that it will flow. Heating it to the higher degree just adds working time. You would be better to heat your glue as properly called for, and gently heat the glass panel during application to keep the glue from jelling too quickly thus increasing flow time and evenness. Evenly applied glue will chip faster and more predictably.
Pat
-
Larry White
- Posts: 1213
- Joined: Thu Apr 08, 2004 4:18 am
-
Sarah King
- Posts: 167
- Joined: Fri Apr 09, 2004 8:43 pm
- Location: Oak Park IL
- Contact:
Hide glue is a protein and all proteins have a very specific melting point. If it gets too hot it changes its nature - Just like an egg white when you fry it. If you "fry" the glue it won't stick to anything.
Dry hide glue is like a bunch of tight tangled springs covered with suckers - a curled up octopus. When the suckers get warm, they relax. When the spring gets wet, it unwinds. So to chip the glass you first get the protein springs all warm and wet. You apply them to warm glass so that they stay warm long enough to attach tight to the glass. When they dry the springs tighten up and pull the top layer of glass up with them.
All of which means that the best way to chip the glass should be to place it in front of a really good air conditioner - not in front of a heater. Since I don't have an air conditioner I haven't tried this but I bet its why Mike Jackson seems to have good results in Wyoming in the winter - cool and very dry.
The above information is from my neice who is a microbiologist. It makes sense to me - and shows why the gelling stage is so important since that is the stage when you are trying to get those suckers stuck as tightly to the glass as possible before they start to dry out.
Sarah King
AngelGilding.com
AngelGilding.com
-
Kent Smith
- Posts: 569
- Joined: Fri Dec 31, 2004 6:41 pm
- Location: Estes Park, CO
- Contact:
glue
Having opened my mouth before, metaphorically, I would like to say that Pat's advice is the best and Sarah has described the process eloqquently. In defense of the microwave comment, which I obviously did not make clear, I only use it with very small quantities, and ounce or so and the process is not to nuke the mix into submission. I heat for 10 or 20 seconds at a time and stir. This is good for those quick little spots one has occaisionally. As I said before, glue pot with controlled temp is preferrable for all of the reasons Pat described.
-
Mike Jackson
- Site Admin
- Posts: 1705
- Joined: Tue Apr 06, 2004 11:02 pm
- Location: Jackson Hole, WY
- Contact:
I'm not sure about the air conditioner part. "The Rocky Mountain Chip" is probably more due to the dry climate than the temperature. The heat box Rick made was to dry out the air there in California.
Mike Jackson
Mike Jackson
Mike Jackson / co-administrator
Golden Era Studios
Vintage Ornamental Clip art
Jackson Hole, WY
Photography site:
Teton Images
Jackson Hole photography blog:
Best of the Tetons
Golden Era Studios
Vintage Ornamental Clip art
Jackson Hole, WY
Photography site:
Teton Images
Jackson Hole photography blog:
Best of the Tetons
-
Sarah King
- Posts: 167
- Joined: Fri Apr 09, 2004 8:43 pm
- Location: Oak Park IL
- Contact:
I'm not sure about the air condition either but it would fit the theory of how glue works.
I've tried chipping with a small room de-humidifier. The air gets very, very dry but the temperature in my tent goes up to about 120 degrees. The theory states that heat relaxes the bonds between the glue and the glass wihich is not what we want. The best and fastest chipping I ever did was in January without the dehumidifier when my shop was naturally very chilly and very dry. The glue gelled fast and started to chip almost before I could finish trimming it.
If I had an airconditioner, I would set up a race - put one piece in a heat box and one in front of an air conditioner and comapre the time and results. This time of year in Chicago, it's hard to find anybody willing to freeze themselves out of the house for a scientific experiment. I'll just have to wait for January to roll around and try it again.
Sarah King
AngelGilding.com
AngelGilding.com
-
Larry White
- Posts: 1213
- Joined: Thu Apr 08, 2004 4:18 am
Air Conditioner
I tried the air conditioner method when Sarah first mentioned it. It didn't work. In fact, it didn't chip at all.
My tried and true method of mixing the glue per the directions, heating it in a glue pot, flowing it out over the glass, then allowing it to dry to a transparent hard state, then putting it in my glue chipping cabinet, has yielded consistant good results. My cabinet goes up to about 100 degrees and the humidity drops to around 35%. The glue will consistantly chip overnight.
I think being fairly precise in the preparation and execution of the process is important. I followed Rick's instructions, and with good results, I have never really waivered much from them.
-Larry
-
DAVE SMITH
- Posts: 1213
- Joined: Sat Jul 10, 2004 11:12 am
- Location: ENGLAND
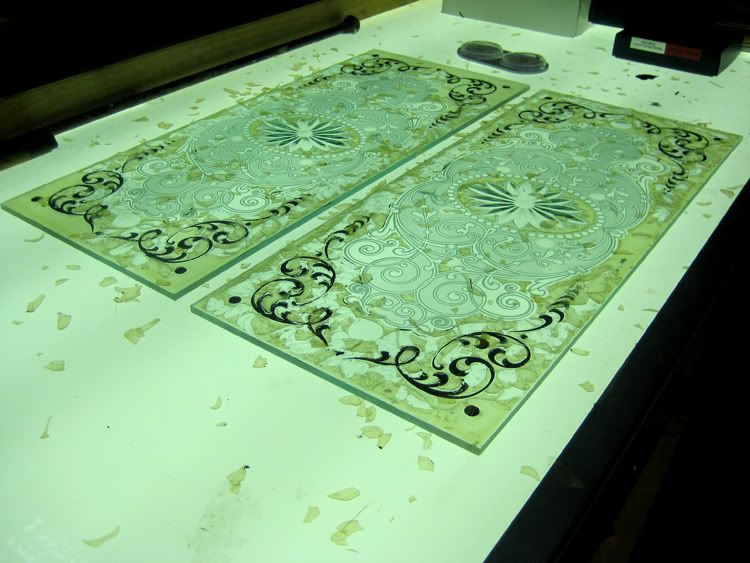
The method I use always works very well. I am also like Rick was next to the coast so humidity is high here. I warm the glue up to a liquid form get the glass warm and the room ,sweep off the sandblast dust or wash it off works well also. Pour your glue on to your glass at the required thickness let it sit for 3 hours till it's gelled still keeping the room warm ,then turn on your lightbox and let it do its thing - works for me very well everytime. lovely fern patterns! Humidity at 25% temprature on the surface of the glass 80/90 .I think with the heat rising up to the glue and drying the underneath first could be the factor for this method. For a snail chip as stated before I pour on the glue in a cool room and prevent it from drying as much as possible no fans or any drying heaters. takes a few days to dry - then you get your snail chips. Personel preference I guess with all these methods. I remember seeing the glue just chip away at Noel's Boise meet and thinking how easy is that, no boxes lights nothing just going through the whole process without gadgets.
Here is a recent job chipped the lightbox way.
Here is a recent job chipped the lightbox way.
Last edited by DAVE SMITH on Wed Nov 28, 2007 1:29 pm, edited 1 time in total.
-
Sarah King
- Posts: 167
- Joined: Fri Apr 09, 2004 8:43 pm
- Location: Oak Park IL
- Contact:
Larry,
Thanks very much for trying it. It is very interesting that it didn't work. There must be something going on with the little proteins that I haven't figured out yet but I can't agrue with success - if it works, it works! Now I don't have to buy an air conditioner - which is great.
Thanks very much for trying it. It is very interesting that it didn't work. There must be something going on with the little proteins that I haven't figured out yet but I can't agrue with success - if it works, it works! Now I don't have to buy an air conditioner - which is great.
Sarah King
AngelGilding.com
AngelGilding.com
-
Patrick Mackle
- Posts: 478
- Joined: Thu Apr 08, 2004 10:21 am
- Location: Monrovia, Ca.
- Contact:
I had to jump in here, but am currently in a MOUNTAIN of work, so quickly...
Force drying the glue causes problems. The entire reason the glue works as a "tool" to pull off the glass is because it is basically not just a layer of glue but a mechanical device with different things happening at different levels. Kind of like a sandwiched circuit board.
The bottom of the glue in contact with the glass must have time to casually adhere to the glass. As the water leaves the bottom-most layer of the glue, it must migrate though the uppermost layer. From then on, until the glue layer is completely dry, there will be a difference in the moisture content between the top and bottom of the layer. This is what gives the glue its mechanical leverage to act as a "tool" able to pull up the glass. This is the reason that the chips come up in curled shapes. Forcing the glue to dry quickly greatly narrows down the window of time that the glue can utilize this property, thus if you are lucky your panel will chip completely, which is rare. Usually it will not chip at all, or just stop right in the middle causing you to wonder "what happened, it was doing so good?"
The 'curl" shaped chips that pop off the panel indicate that the bottom glue layer adhered to the glass and was held at a fixed size, while the upper layer being affixed to that layer attached to the glass was free to shrink much further to its natural volume before it was soaked in water. This ratio is the wrenching power of the glue working upon itself that causes the glass to chip.
The way it was relayed to me, Rawson and Evans chipped their glass in the simplest of ways. At the time when the panels were ready to be subjected to a heated environment, they were placed onto wooden racks with simple gas burners placed on the floor beneath, and the whole setup was then covered with a tarp. The next morning all the panels would be chipped. It was not mentioned whether or not there were any vents or holes in the tarp, but I believe there should have been to allow moisture to rise out.
I have seen commercial glue chip companies that employ dehumidifiers for production chipping. The chip patterns they offer, even when they double chip, do not compare to the deeper polished chip that looks so bright and rich when gilded or silvered that I have seen on the old Rawson & Evans pieces.
Let me mention that this is what I believe based on trial and error and many years of close observation and thanks to Sarah King for adding the scientific facts about collagen adhesive.
Back to work Mr. Olafson!
Pat
-
Sarah King
- Posts: 167
- Joined: Fri Apr 09, 2004 8:43 pm
- Location: Oak Park IL
- Contact:
And thank you Pat for your expertise. I figure the more a person knows about how and why something works the less they need to depend on "magic" to get consistant results.
I would like to ask Dave about his light table. I assume that it contains long flourescent tube lights and that the main source of heat is from the ballast box. What is the temperature and relative humidity in your shop away from the light table?
I would like to ask Dave about his light table. I assume that it contains long flourescent tube lights and that the main source of heat is from the ballast box. What is the temperature and relative humidity in your shop away from the light table?
Sarah King
AngelGilding.com
AngelGilding.com
-
DAVE SMITH
- Posts: 1213
- Joined: Sat Jul 10, 2004 11:12 am
- Location: ENGLAND
-
Mike Jackson
- Site Admin
- Posts: 1705
- Joined: Tue Apr 06, 2004 11:02 pm
- Location: Jackson Hole, WY
- Contact:
Dave,
There are little black dots in each corner. Are these part of the design, or small felt pads keeping the glass from scratching the faces together?
Mike Jackson
There are little black dots in each corner. Are these part of the design, or small felt pads keeping the glass from scratching the faces together?
Mike Jackson
Mike Jackson / co-administrator
Golden Era Studios
Vintage Ornamental Clip art
Jackson Hole, WY
Photography site:
Teton Images
Jackson Hole photography blog:
Best of the Tetons
Golden Era Studios
Vintage Ornamental Clip art
Jackson Hole, WY
Photography site:
Teton Images
Jackson Hole photography blog:
Best of the Tetons
-
DAVE SMITH
- Posts: 1213
- Joined: Sat Jul 10, 2004 11:12 am
- Location: ENGLAND
-
Kent Smith
- Posts: 569
- Joined: Fri Dec 31, 2004 6:41 pm
- Location: Estes Park, CO
- Contact:
Chemistry
I am somewhat spoiled in that our temp and humidity level are well suited to chipping. We just lay the piece out on the table and by sometime the next day they are perfectly chipped. Having said that, I have always said that knowing the chemistry is critical to continued success. I am often astounded that false chemistry prevails so often and gets in the way of reality. For instance, the idea that paint will stick better if you add a hot solvent or hardener or that an inscription will last longer if you varnish over it. One of these days I will finish writing an article debunking junk science in the industry, but I am still collecting ideas for topics to fill a full article.
Thanks to Pat and Sarah for sharing your knowledge. It really helps to understand the processes so that we can avoid errors or determine causes of both successes and failures.
Thanks to Pat and Sarah for sharing your knowledge. It really helps to understand the processes so that we can avoid errors or determine causes of both successes and failures.
-
Sarah King
- Posts: 167
- Joined: Fri Apr 09, 2004 8:43 pm
- Location: Oak Park IL
- Contact:
Not all glass is the same
While we are looking at cause and effect, I have been wondering if Rawson and Evans got those deep polished chips because they were using softer glass rather than because of their drying techniques. Not all glass is the same. Even when the same technique is used to make the glass the formulas different manufactures use are different - two companies make two different kinds of float glass for instance.
The glass that Rawson and Evans used was polished plate glass which is - so far as I know - not made at all any more because it was very labor intensive. I have noticed a big difference between cutting, etching and chipping drawn resotration glass and float glass. Schott resotration glass is softer than Diamante glass and 1/4" float glass is much harder. I bet a real perfectionist could even tell the difference between Diamante glass and Staftire glass too if you really want to get into that level of detail - which may not be worth it.
The glass that Rawson and Evans used was polished plate glass which is - so far as I know - not made at all any more because it was very labor intensive. I have noticed a big difference between cutting, etching and chipping drawn resotration glass and float glass. Schott resotration glass is softer than Diamante glass and 1/4" float glass is much harder. I bet a real perfectionist could even tell the difference between Diamante glass and Staftire glass too if you really want to get into that level of detail - which may not be worth it.
Sarah King
AngelGilding.com
AngelGilding.com
-
Kent Smith
- Posts: 569
- Joined: Fri Dec 31, 2004 6:41 pm
- Location: Estes Park, CO
- Contact:
glass
I have wondered the same thing and have had some spectacular results with really old glass. It is obvious that a harder finished glass would not chip as well or as deep as a softer glass. I can get Stafire here but have not tried it. There is a fellow nearby who is making his own float glass and polishing it but he will only make about one to two foot square for now. We got some great fern chips with one of his as an experiment. It would be interesting to know if there is a way to tell the hardness or if the manufacturers have a scale or way to control that? I am sure there is another chemistry lesson in this one.
I had an 1891 piece in for repair a few months ago and the surface even seemed "soft" compared to a replica I made to match for the customer's display use. The chips were very different as well and the tin seemed to cover differently too. The silver was much slower to deposit on the old glass but it was just as brilliant after.
I had an 1891 piece in for repair a few months ago and the surface even seemed "soft" compared to a replica I made to match for the customer's display use. The chips were very different as well and the tin seemed to cover differently too. The silver was much slower to deposit on the old glass but it was just as brilliant after.
-
Sarah King
- Posts: 167
- Joined: Fri Apr 09, 2004 8:43 pm
- Location: Oak Park IL
- Contact:
Kent,
The difference you saw in silvering old and new glass is very interesting - especially in the tin since no one (so far as I know) seems to know just exactly how the tinning process works. I'll have to see if I can get some very old clear glass (maybe from repairing some old stained glass windows) and take a look for myself. Thanks for mentioning it.
The difference you saw in silvering old and new glass is very interesting - especially in the tin since no one (so far as I know) seems to know just exactly how the tinning process works. I'll have to see if I can get some very old clear glass (maybe from repairing some old stained glass windows) and take a look for myself. Thanks for mentioning it.
Sarah King
AngelGilding.com
AngelGilding.com
-
Kent Smith
- Posts: 569
- Joined: Fri Dec 31, 2004 6:41 pm
- Location: Estes Park, CO
- Contact:
tin
Hi Sarah,
The tin seemed to sheet better and quicker on the old glass and before rinsing, it appeared thicker.
The tin seemed to sheet better and quicker on the old glass and before rinsing, it appeared thicker.
 Denver Chapter of the Letterheads