Welcome to The Hand Lettering Forum!
This is an interactive Bulletin Board on the topics of Sign making, design, fabrication, History, old Books and of coarse Letterheads, Keepers of the craft. The Hand Lettering Forum features links to resources, sign art history, techniques, and artists profiles. Learn more about Letterheads at https://theletterheads.com. Below you'll see Mchat has been added as a live communication portal for trial, and the Main forum Links are listed below.

Signmaking 101: Doming dimensional letters

Hand Lettering topics: Sign Making, Design, Fabrication, Letterheads, Sign Books.

Moderators: Ron Percell, Mike Jackson, Danny Baronian

Post Reply
Danny Baronian
Site Admin
Posts: 638
Joined: Wed Apr 07, 2004 2:16 am
Contact:

Signmaking 101: Doming dimensional letters

Post by Danny Baronian »

Signmaking 101: Doming dimensional letters

If you've ever wanted to dome dimensional letters, here's a quick, inexpensive way to begin.

As with any technique you do for the first time, cut several extra letters or shapes, and use those as a test.

You'll need a plastic refillable bottle, the type used in restaurant's for ketchup, which can be purchased at Smart and Final. A 4-6 pack of empty bottles cost about $ 4.

Stir stick: anything to stir up the epoxy with. I use tongue depressors purchased at Tap Plastics in a box for $ 8. These are great for stirring in a dixie cup, and a box will last for years.

Epoxy - a general purpose 1 to 1 epoxy. Here on the west coast we have a chain of stores called Tap Plastics which carries casting supplies, plastic, adhesives, and fiberglass supplies. When I need large quantities I purchase wholesale through supply houses that specialize in modeling and casting supplies. From Tap a can of A and B will cost around $ 14 for 1/2 pint of material of each.

Several sign mags advertise epoxy for doming, the price is $ 99 a quart. Tap sells the same material for $ 30 a quart. Purchased at a modeling / casting supply house will cost about $ 40 - 50 a gallon.

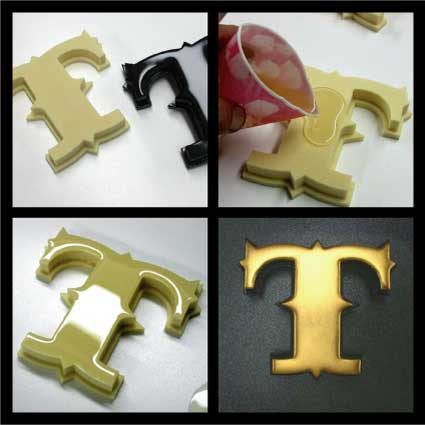
Photo upper left: raw HDU cut out letter on the right, duplicate letter on the right domed and painted black.

Use a piece of wood large enough to hold all the letters you'll be doming, taking care make sure it's level. When pouring on start 1/8" from the edge, continuing around the permitter until you have a continuous enclose bead of epoxy, then begin filling in the center, taking care to make sure you don't add so much liquid it spills over the edge. If the epoxy does not go all the way to the edge, take a tongue depressor, nozzle of the bottle or popsicle stick and nudge the epoxy toward the edge. With practice, you can easily fill letters in without having to nudge the epoxy. I used a dixie cup rather than a dispenser since I only had three letters to do.

Epoxy may also be tinted or colored by the addition of epoxy colorants, enamel, lacquer or universal tinting colors. No water based paints. If you do add color, add a little to both A and B stirring the color into both individually, then again by adding the A and B together. Bronzing powders can be added to clear epoxy, mixing at a ratio of 1.5 metal powder to 1 part epoxy.

Upper right: This letter is 5" tall, and required about 1/10th of an ounce of combined A and B. Carefully measure out equal amounts of each - 1:1, and stir well, then stir some more. Mixing the two together will produce hundreds of air bubbles, let the cup sit for a minute or two before you pour onto the letter.

Open time for mixed epoxy is 10 - 15 minutes, mix and use only what can be easily be dispensed in that time. After application if bubbles are visible, they can be lightly misted with isopropyl alcohol or use of a propane torch. Carefully, and quickly pass the torch over the letters. If using a torch, start farther back and adjust distance until you see the bubbles dissipate. Get the torch too close and you might want some marshmallows nearby, though the fumes many not make for good tasting somemore's. Properly done the bubbles will rise to the surface and pop.

If you're doing a quantity of letters, fill the bottle half full. With the bottle upright, squeeze as much air out as possible without dispensing any liquid, invert the bottle, hold the bottom and let the bottle suck in air, equalizing the pressure. The liquid can then be dispensed onto the letters. As long as you don't turn the bottle right side up, you can move from one letter to another without the epoxy dripping out. If you need to set it down, set it down nozzle first into a heavy cup.


Lower left: applied epoxy, no bubbles, edge to edge fill. Tip: if you want know the epoxy is dry, squeeze out a small amount on the board. Touch this spot rather than a letter. Epoxy should set up in about an hour at 60 - 70 degrees, longer at lower temperatures. Clean up with acetone.

Lower right: HDU letter, epoxy domed painted black and gilded.


Image
Danny Baronian
Baronian Mfg.
CNC Routing & Fabrication
http://www.baronian.com
Raymond Chapman
Posts: 345
Joined: Fri Apr 09, 2004 5:50 pm
Location: Temple. Texas

Great information

Post by Raymond Chapman »

Danny - Thanks for the great information. Very well done.

We use this same method and have had excellent results. We use PB Resin made by Coastal Enterprises, but it's evident that you have a less expensive product. We don't have those stores here in Texas, but I'm sure there are similar type outlets in some of the larger towns. Not too many specialty stores in a town of 14,000.

We buy the mustard dispensers at Wal-Mart - about fifty cents each.
Mike Jackson
Site Admin
Posts: 1705
Joined: Tue Apr 06, 2004 11:02 pm
Location: Jackson Hole, WY
Contact:

Post by Mike Jackson »

Hi Danny,
You did a great job on the Doming 101 post. Wow, that had to have taken some time--all just for the benefit of a few of us readers! Thanks a bunch.

Now that I see these photos, I have additional questions for you or anyone else that has done it:

Adhesion: You used epoxy on raw HDU. I assume you blew off the excess dust first. I am sure the epoxy gets a great bond on the foam. knowing it can get into the open pores. Have you ever poured over a finished, painted surface? Have you poured epoxy over a piece of material like redwood or cedar, prone to slight swelling or shrinking over the years. Would you suggest limiting the size of the letters on exterior wood signs?

Vinyl Letters: Some of the emblems on sports equipment and vehicles have domed emblems. I saw someone doming small Edge labels at the Boise meeting. Have you ever tried doming cut vinyl letters (odd shaped of course), while they are still on the liner paper? On small labels, such as .3" x 1.5", what kind of despensor would you use? Or, how would you do that?

Painting: You gilded the letter in the step-by-set. The gold size apparently grips the epoxy, but did you have to prep the dried epoxy? Would paint grip to it equally well?

Thanks again!
Mike Jackson / co-administrator
Golden Era Studios
Vintage Ornamental Clip art
Jackson Hole, WY

Photography site:
Teton Images
Jackson Hole photography blog:
Best of the Tetons
Danny Baronian
Site Admin
Posts: 638
Joined: Wed Apr 07, 2004 2:16 am
Contact:

Post by Danny Baronian »

Mike,

the letters pictured were just brushed off well. On HDU if I was going to paint the whole letter,I'd apply the epoxy first. If you wanted a painted letter with a clear face, paint first, epoxy last. It just depends of the effect you want.

The epoxy sticks well to wood. as well as most products usually found in your shop. On PVC, acrylics or any materials with slick surfaces, scuff the surface first with 220. Personally I don't use wood for letters, using HDU or PVC instead. The epoxy should hold up for several years without maintenance or fading and don't see any problem with larger letters outdoors unless expansion and contraction between the two materials causes crazing. The best way to determine that would be to make several, treat them and tack them up outside. If anyone has ever visited Sparky Potter in Vermont, the back of his house has just such letters all over his back porch. Not only does it look cool, it lets him know just how well the materials and finishes hold up.

If the letters are to be painted, once the epoxy is dry, spray with water and wet sand with 400 grit sandpaper, wash off and paint as usual. When gilding I finish with 2000 wet dry sandpaper and water. Once the epoxy is cured, the surface is extremely hard, so you can sand aggressively without effecting the fine details.

Doming emblems is done in much the same way, but will be covered in Part II at the end of the week.
Danny Baronian
Baronian Mfg.
CNC Routing & Fabrication
http://www.baronian.com
Raymond Chapman
Posts: 345
Joined: Fri Apr 09, 2004 5:50 pm
Location: Temple. Texas

Painting Letters

Post by Raymond Chapman »

We have mixed One Shot Lettering enamel into the epoxy mix but had some varied results. At close range you can see a concentration of the color along the center of the letter where the epoxy is heavier. We have also had some yellowing of letters that had white mixed in the epoxy, so now we put on the epoxy and then paint over them

Unlike Danny, we don't do any prep of the epoxy after it is dry - just spray with Krylon or One Shot Lettering Enamel. No problems yet. Also, we just add size directly to the epoxy and gild - no prep of the expoxy and have seen no problems after about three years.

We did have some problems when we painted the HDU letters and then put on the epoxy. The letters were black and we put on epoxy and then gilded. There was some separation of the epoxy from the letters after they were out in the weather for about a year. This was only on two letters out of over 25.

I haven't tried the PB Resin over vinyl like Mike talking about. It seems to be a little thinner and not as clear as the demonstrations I've seen of the doming epoxy for vinyl. I think the doming epoxy has a short shelf life...from what I've heard.

Coastal Enterprises recommends that their PB Resin be put on raw HDU - after blowing off as much dust as possible.
erik winkler
Posts: 1097
Joined: Sat Feb 23, 2008 5:48 pm
Location: Amsterdam Netherlands
Contact:

Impressed

Post by erik winkler »

Hello it is me again...

I think i found a new treasure here....
Are there many people using this technique?
Because what i read in the Wood- and HDU carving books is that everybody just carves the embossing seen here.

I am very interested in this embossing/doming, because i made the beginners mistake :oops: of gilding part of my design in sandblasted wood that were totally flat. The gold does not reflect in a nice way and i was looking for a good way to 3d these parts.
Realizing we are in the 2nd renaissance of the arts.
Learn, copy and trying to improve...
Still in the learning phase ;-)
Amsterdam Netherlands
www.ferrywinkler.nl
www.schitterend.eu
www.facebook.com/Schitterend.eu
Billy Pickett
Posts: 118
Joined: Mon Aug 02, 2004 11:59 am

Post by Billy Pickett »

...This is so timely, since I am currently making some epoxy on hdu experiments myself. I have done some before, and they turned out well, but I can see how it could get out of control too easily.
At that time I used the Pb, but later when I wanted to use it again it had gotten hard in the can, and my expensive epoxy was wasted. So, since then I have been wondering, will (cheaper) 'hardware store' epoxy work? If the epoxy has a "blush" or film, is that a concern? And, is it possible to lay gold leaf on the dry, bare-unpainted-unsized 'domed' epoxy. If so, are there any (minimal) prep and timing recommendations? Has anybody tried water gilding on it??? ...Thanks yall.
Danny Baronian
Site Admin
Posts: 638
Joined: Wed Apr 07, 2004 2:16 am
Contact:

Post by Danny Baronian »

Basically epoxy is epoxy, some more expensive as for marine or aeronautical use, but the formulas are basically the same. It also has a shelf life depending how it's stored, the cooler it is, the longer it will last, but don't rely on it lasting more than a year. If you don't think you'll use much, get a smaller quantity.

The epoxy you get at the hardware store will be fine. If they don't carry it, check for a local supplier under casting supplies that provide a better price and usually have people that can help out with any questions you may have.

The blush is of no concern as long as it's being covered with paint or leaf. When the epoxy is cured wipe down with a rag and alcohol and your set to go. You can also add a small amount of oil based paint to the epoxy and it will not affect the curing.

Never tried water gilding as the final gild would be easily damaged unless it was clear coated; for that it would be better to use oil size. If you wanted to try, scuff the epoxy with 0000 steel wool and add a drop of two of ivory liquid soap to your size.

Danny
Danny Baronian
Baronian Mfg.
CNC Routing & Fabrication
http://www.baronian.com
erik winkler
Posts: 1097
Joined: Sat Feb 23, 2008 5:48 pm
Location: Amsterdam Netherlands
Contact:

Time on my side

Post by erik winkler »

But Danny,.... do you ever carve the sides, of routed letters, to a bevelded edge? Or is this in your opinion the best timespending way?
Realizing we are in the 2nd renaissance of the arts.
Learn, copy and trying to improve...
Still in the learning phase ;-)
Amsterdam Netherlands
www.ferrywinkler.nl
www.schitterend.eu
www.facebook.com/Schitterend.eu
Scooter Marriner
Posts: 14
Joined: Thu Apr 24, 2008 12:51 pm
Location: Oakland, Califoria
Contact:

Post by Scooter Marriner »

I've used the "expensive" kits made by Acudome - preload syringe packs (sort of like a mini caulking gun). The nice things about the Acudome product are:

they pre-mix in the syringe - no measuring
the syringe makes it possible to do very fine work (1" and 2" letters are no problem)
very portable
easy to practice with until you get the hang of it all
you can do outlines and other "scroll" work

their starter kit also has a mini butane torch that's handy for removing tiny bubbles (heat the epoxy while it is still flowing and the bubble release)

the ketchup bottle method is a better choice for larger letters (over 4" maybe?) because of the cost savings

-- Scooter

here's the link to their product
http://www.glotrax.com/acudome.html
--- . -- Still a beginner
erik winkler
Posts: 1097
Joined: Sat Feb 23, 2008 5:48 pm
Location: Amsterdam Netherlands
Contact:

Flat doming

Post by erik winkler »

I just domed acrylic routed letters about 10 inch high.
But i think the relief is rather flat..... :(
How can I create higher doming and still maintain some pourability?
Realizing we are in the 2nd renaissance of the arts.
Learn, copy and trying to improve...
Still in the learning phase ;-)
Amsterdam Netherlands
www.ferrywinkler.nl
www.schitterend.eu
www.facebook.com/Schitterend.eu
Mike Jackson
Site Admin
Posts: 1705
Joined: Tue Apr 06, 2004 11:02 pm
Location: Jackson Hole, WY
Contact:

Post by Mike Jackson »

Erik,
There are more people here with a lot more experience with this topic, but I think there is a point of diminishing return as you get above about 6" tall letters. I am sure some people have done even larger than 12" letters, so it isn't "against the rules". At least from what I have seen, it works best on small areas like labels, small letters and graphics about 3" tall or less. As you get bigger, you start getting a lot of flat areas that don't have the rounded effect. If you pour the epoxy on thicker, you run the risk of it finding a spot to waterall off onto the background.

Mike Jackson
Mike Jackson / co-administrator
Golden Era Studios
Vintage Ornamental Clip art
Jackson Hole, WY

Photography site:
Teton Images
Jackson Hole photography blog:
Best of the Tetons
erik winkler
Posts: 1097
Joined: Sat Feb 23, 2008 5:48 pm
Location: Amsterdam Netherlands
Contact:

Doming versus Routing

Post by erik winkler »

Mike,

Thanks for your reply.
I called the firm who sells (and is the specialist of) the epoxy and he sugested i should use an other kind of epoxy.
"The first one i used is epoxy for moulding and very thin the second is used to brush on and even stays stuckon the ceiling, without dripping".
I bought the second one and it has a yoghurt like viscosity and instead of transparant has an opaque white colour.
Result on the acrylic letter: still flat! (Again 50 dollars down the drain.... :( )

This morning I came up with the idea to router the pre-bought acrylic letters and extra router the edges round.
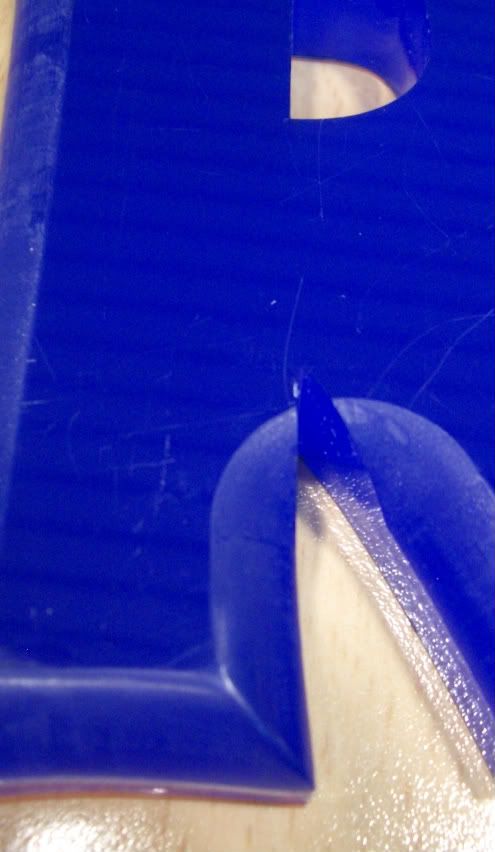
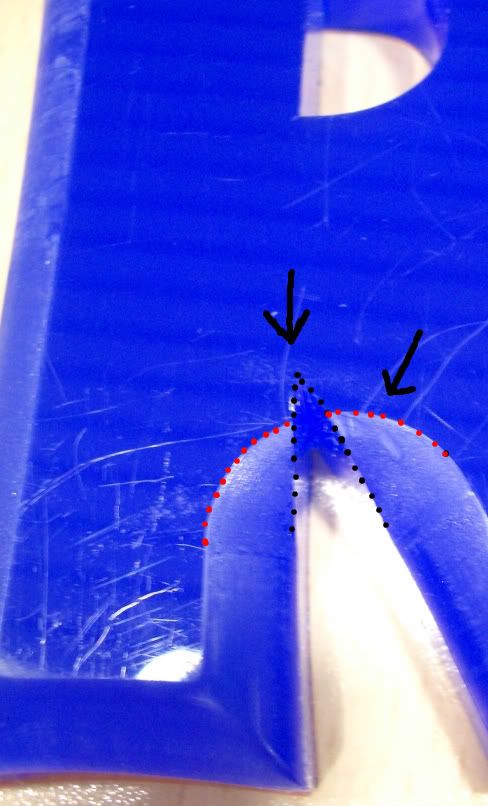
Result on straight edges it looks great!!!! But I can not make the corners because my handheld router, which I screwed up-side down underneath a table has router-bits that have a ball-bearing of 9mm.
I just looked into the books and these ball-bearings are also available in the minimum size of 4,8mm, but that will still not let the router work the small angles.

Here i have some pictures to show the result.

Image
Image

What can I do, to make the edges curved/round/bevelled so that the gilding will pop instead of fall dead because it is on a flat surface?
A 3-D CNC router is not yet an option due to lack of available space within the firm.
Last edited by erik winkler on Sat Oct 25, 2008 1:53 am, edited 1 time in total.
Realizing we are in the 2nd renaissance of the arts.
Learn, copy and trying to improve...
Still in the learning phase ;-)
Amsterdam Netherlands
www.ferrywinkler.nl
www.schitterend.eu
www.facebook.com/Schitterend.eu
joe cieslowski
Posts: 338
Joined: Sun Apr 11, 2004 6:15 pm
Location: east canaan ct
Contact:

Post by joe cieslowski »

Eric,

I believe you have discovered the shortcommings of this technology. I may be wrong but I don't think a CNC will solve it.

If this was made of HDU, you could take out that corner correctly with hand tools and a little sand paper. It would be a little tough in acrylic.

Joe,

Makin Chips and Havin Fun!
Makin Chip$ and Havin Fun!
vance galliher
Posts: 321
Joined: Mon Apr 12, 2004 11:38 pm
Location: springfield, or.
Contact:

Post by vance galliher »

Eric, since the CNC router cuts with a spinning round bit, I now have most of my stuff cut with a water-jet. Althought you can't get prismatic, bevel, or stepcut effects with the water-jet, it does eliminate the rounded inside corners
Doug Bernhardt
Posts: 1077
Joined: Fri Apr 09, 2004 9:29 am
Location: Ottawa Canada
Contact:

Post by Doug Bernhardt »

Hi Eric, I'm with Joe on that and really have no experience with CNC or Vance's water jet method. Foam and a routertable(you already are using that) with hand tools and sandpaper to finish. You can do some pretty elaborate work with just those basics.
Dan Sawatzky
Posts: 48
Joined: Mon Apr 12, 2004 8:48 pm
Location: Yarrow, B.C. Canada
Contact:

Yup

Post by Dan Sawatzky »

With a CNC router and a small but this wouldn't be a problem. As for otehr ways save hand tools... don't know the answert.

-grampa dan
Isn't it great to love what love what you do and do what you love!
Post Reply