
Welcome to The Hand Lettering Forum!
This is an interactive Bulletin Board on the topics of Sign making, design, fabrication, History, old Books and of coarse Letterheads, Keepers of the craft. The Hand Lettering Forum features links to resources, sign art history, techniques, and artists profiles. Learn more about Letterheads at https://theletterheads.com. Below you'll see Mchat has been added as a live communication portal for trial, and the Main forum Links are listed below.
This is an interactive Bulletin Board on the topics of Sign making, design, fabrication, History, old Books and of coarse Letterheads, Keepers of the craft. The Hand Lettering Forum features links to resources, sign art history, techniques, and artists profiles. Learn more about Letterheads at https://theletterheads.com. Below you'll see Mchat has been added as a live communication portal for trial, and the Main forum Links are listed below.
How was This Done?
Moderators: Ron Percell, Mike Jackson, Danny Baronian
-
Bobbie Rochow
- Posts: 79
- Joined: Mon Jul 25, 2005 6:18 pm
- Location: Jamestown,PA
How was This Done?
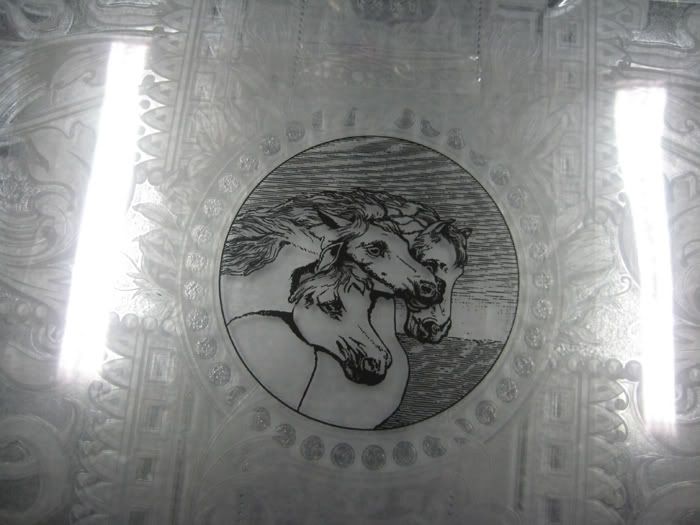
A customer has emailed me this photo & wants to know if I can do something similar with a photo of their building. How was this done? hope I can get the pic on here....
-
Bobbie Rochow
- Posts: 79
- Joined: Mon Jul 25, 2005 6:18 pm
- Location: Jamestown,PA
Found this on the net....
http://www.goldreverre.com/signgallery/ ... close.html
I believe the artist was Bruce Jackson?
http://www.goldreverre.com/signgallery/ ... close.html
I believe the artist was Bruce Jackson?
-
Bobbie Rochow
- Posts: 79
- Joined: Mon Jul 25, 2005 6:18 pm
- Location: Jamestown,PA
FOUND IT!
Got it! Found Bruce's website & found this info on the pictorial....
Engraving a Design
This is the oldest method of imposing a design in glass gilding. It was used exclusively in Roman times and was also the standard into the 14th-15th Century. First described by Cennino Cennini, it is simply a matter of scratching the design into the gold. The technique is very similar to dry point etching or copper engraving.
Once the water gilding is finished you simply scratch the design with a point. You scratch right through the gold and later back up the work with paint (usually black). This shows through with strong contrast.
I find metal points are the most reliable, but you don't need to press very hard. Press too firmly and you might scratch the glass itself. The leaf is so thin that you can't vary the line by pressure. You choose the point according to the thickness required. I have used many types of points, a blunt rounded tip for a thicker line and a needle for a very fine line. A knitting needle makes a useful stylus. Other suitable materials are bone and hard plastic.
Sharpened wood can work well for a thicker line but sometimes it is not able to scratch through evenly, especially if the size was mixed on the strong side. Engraving tends to be a very fine process when using a stylus. Thicker or coarser line work is best done with paint first followed by a gilded backing.
Another useful method is scratching with steel wool. Obviously it's not precise like a point but can provide a soft blended shading to the gold. Backing this up with a red bole colour is an effective method of creating an antique finish. (See also blended gilding and ink antiquing).
You can lay the glass face down on a dark cloth while you work to see the lines. Because of my background doing shop windows, I usually engrave looking through the work to the outside daylight. I find this very clear to see. One thing to remember though, when it is looking good, you still haven't taken off enough gold. You always need to scratch more off than you think.
The gold is visually dominant and even when it looks like there is plenty of background showing through you can often still take off more gold to bring in the dark areas. A small amount of residual gold or a few fine lines will reduce a black to a mid-tone.
You can mark out the design before scratching by tracing it on gently with carbon paper as in marking out lettering. Another thing I have sometimes done is to paint in some key lines before gilding. This outlines the design and acts as a guide. These painted lines are thicker than the engraved lines and care must be taken that they don't look coarse.
You can also engrave matt gold (oil gilded) but it is not as fine and tends to tear up the size leaving it rough on the back. It can look messy and dulled if done too soon on soft size.
-
John Studden
- Posts: 150
- Joined: Wed Jul 28, 2004 11:40 am
That describes it pretty well, the same method was used on the old advertising signs depicting "Factories" with horses & carts etc. although most of those were acid etched first to give the illusion of depth & a slight dulling of the surface to mute the various karats of gold used. When working vertically you can apply a piece of low tack vinyl to the other side of the glass this will show pretty well what the finished look would be, another useful tool is the Glass Brush or Fibre Brush with which you can vary the pressure for shaded areas & speed up the work, these are available from Letterhead Sign Supply.........
John Studden
Valencia Signs, California
Valencia Signs, California
-
Bobbie Rochow
- Posts: 79
- Joined: Mon Jul 25, 2005 6:18 pm
- Location: Jamestown,PA
Thank you John. I will have to check out that brush. I wonder what my work would look like, if I did it as you do "scratchboard", or pen & ink, with crosshatching & such in it.
I am pretty excited! Another new thing to try!
Soon as I get my Boise Whiskey piece framed I will post it. It came out really nice!
I am pretty excited! Another new thing to try!
Soon as I get my Boise Whiskey piece framed I will post it. It came out really nice!
-
DAVE SMITH
- Posts: 1213
- Joined: Sat Jul 10, 2004 11:12 am
- Location: ENGLAND
-
DAVE SMITH
- Posts: 1213
- Joined: Sat Jul 10, 2004 11:12 am
- Location: ENGLAND
Bobbie
I have just finished these horses with the technique John has said about.The glass will be silvered once all the gilding is done,still away to go yet.
Will make a seperate post and poss a step by step on this one.This is the third glass panel for a gypsy Caravan owner over here.
Dave
screen printed resist black outlines x3 prints on top of white acid toning shades - a total of 8 tones used to create this look
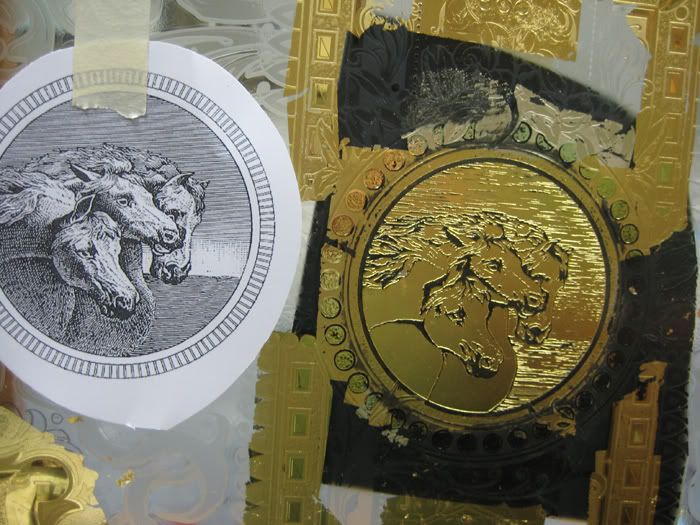
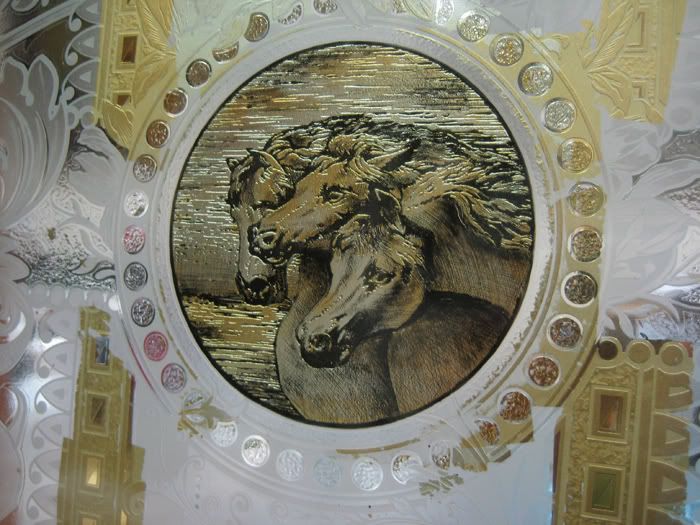
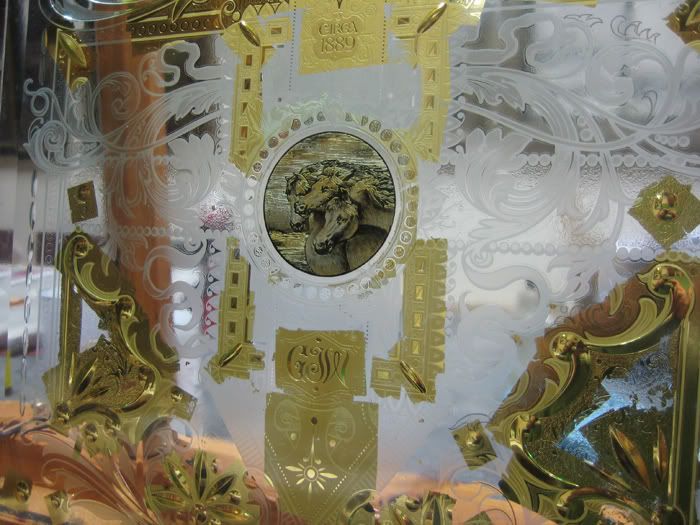
The excess gold will go once backed up on the cuts and punties then it will be silvered.
It gives you an idea where I like to use these types of techniques and plus there so interesting to do.
Dave
I have just finished these horses with the technique John has said about.The glass will be silvered once all the gilding is done,still away to go yet.
Will make a seperate post and poss a step by step on this one.This is the third glass panel for a gypsy Caravan owner over here.
Dave
screen printed resist black outlines x3 prints on top of white acid toning shades - a total of 8 tones used to create this look
The excess gold will go once backed up on the cuts and punties then it will be silvered.
It gives you an idea where I like to use these types of techniques and plus there so interesting to do.
Dave
-
Bobbie Rochow
- Posts: 79
- Joined: Mon Jul 25, 2005 6:18 pm
- Location: Jamestown,PA
That just blows me away. That is amazing & beautiful!
I am going to ask something here, at the risk of seeming really ...un-knowledgable? I have one of those glass etchers by Paasche. I do not have all the equipment or knowledge that you have, Dave, or many of you. But I am wondering if I could do simpler effects with my etcher, to the glass, & get some nice frosty looks. I have played with it a bit & have found I can sort of "airbrush" with it a bit.
What would happen if I gilded the etched parts? It would probably look like a matt finish, I am supposing. I have few small Christmas gifts to do, maybe I can play with them for practice.
I am going to ask something here, at the risk of seeming really ...un-knowledgable?
What would happen if I gilded the etched parts? It would probably look like a matt finish, I am supposing. I have few small Christmas gifts to do, maybe I can play with them for practice.
-
Jerry Berg
- Posts: 369
- Joined: Wed May 02, 2007 3:17 pm
- Location: pacific northwest
-
vance galliher
- Posts: 321
- Joined: Mon Apr 12, 2004 11:38 pm
- Location: springfield, or.
- Contact:
-
erik winkler
- Posts: 1097
- Joined: Sat Feb 23, 2008 5:48 pm
- Location: Amsterdam Netherlands
- Contact:
Dave, I thought that you said, that we allways have to begin with silvering.DAVE SMITH wrote: The excess gold will go once backed up on the cuts and punties then it will be silvered.
Dave
Because the chemicals will destroy other applications like goldleaf (the size), paint etc...
Realizing we are in the 2nd renaissance of the arts.
Learn, copy and trying to improve...
Still in the learning phase
Amsterdam Netherlands
www.ferrywinkler.nl
www.schitterend.eu
www.facebook.com/Schitterend.eu
Learn, copy and trying to improve...
Still in the learning phase
Amsterdam Netherlands
www.ferrywinkler.nl
www.schitterend.eu
www.facebook.com/Schitterend.eu
-
DAVE SMITH
- Posts: 1213
- Joined: Sat Jul 10, 2004 11:12 am
- Location: ENGLAND
Erik.
I told you alott when you were here but you did not remember everything mate.
I gave you a method of gilding and silvering which would be easy to use without problems happening for you.This other way of protecting the gold you would
need to be able to signwrite the back of the gold with a paint that would resist the silvering formula like sericols 2 part catalyst.I recall you saying you would prefer to use masks rather than signwrite. This is why I told you this above method which I use from time to time depending on the job. The reason I am using this method is that I would like to get into the deep cuts and close to the edge without glow lines. plus registration for printing would be impossible
You need to start practicing that signwriting or think about screen printing the back of the gold Erik for flat and upright work if you want to do it this way now.
Hope this helps. Bobbie I would also like to try out one of those airbrushes for shading ,if you needed to silver afterwards the shading would look very dark and dirty though.
Thanks
Dave
Last edited by DAVE SMITH on Thu Nov 27, 2008 11:12 am, edited 1 time in total.
-
erik winkler
- Posts: 1097
- Joined: Sat Feb 23, 2008 5:48 pm
- Location: Amsterdam Netherlands
- Contact:
Be on top of it master Dave!
Realizing we are in the 2nd renaissance of the arts.
Learn, copy and trying to improve...
Still in the learning phase
Amsterdam Netherlands
www.ferrywinkler.nl
www.schitterend.eu
www.facebook.com/Schitterend.eu
Learn, copy and trying to improve...
Still in the learning phase
Amsterdam Netherlands
www.ferrywinkler.nl
www.schitterend.eu
www.facebook.com/Schitterend.eu
-
Kelly Thorson
- Posts: 502
- Joined: Tue Apr 20, 2004 11:53 pm
- Location: Penzance, SK Canada
- Contact:
I'm looking forward to seeing that piece finished Dave. I love the look of the horses!
Bobbie here is a bit of a different take on how you might approach the building.
You can get a photoresist stencil made of your building and sandblast all the areas that are to be black to a shallow depth (make sure you get enough below the surface that you can feel a bit of a ridge). You can then paint the piece with black and once dry scrape off all the excess paint on the surface with a razor blade. This should leave paint in all the blasted areas and you can clean your glass and gild over the surface. If you have access to a fine grit of silica carbide it works great.
Sandblasting areas to make them matte before water gilding works great.
I believe there is no shame in failure. Rather, the shame lies in the loss of all the things that might have been, but for the fear of failure.
-
Bobbie Rochow
- Posts: 79
- Joined: Mon Jul 25, 2005 6:18 pm
- Location: Jamestown,PA
 Denver Chapter of the Letterheads