Welcome to The Hand Lettering Forum! This is an interactive Bulletin Board on the topics of Sign making, design, fabrication, History, old Books and of coarse Letterheads, Keepers of the craft. The Hand Lettering Forum features links to resources, sign art history, techniques, and artists profiles. Learn more about Letterheads at https://theletterheads.com. Below you'll see Mchat has been added as a live communication portal for trial, and the Main forum Links are listed below.
Hi There Ron....long time! Winter up here in Canukland is the best time for chipping...dry and cold although the "dry" part is everything. It's the opposite in summer when chipping is a challenge. My techniques are decidedly low-tech (although this will change) winters....just apply glue and leave open in the shop. It might require a little extra heat so I have a quartz lamp that'll get suspended over the glass. Being too close is of course death to glass as it will facture really easily if the temperature is different from the center of the glass to the outer edges. Summers pretty much the same thing only it always takes longer in humid weather....and I'll just put them in the sun rather than use the heaters. One day soon I'll build a proper booth with lamps and heater/dehumidifier. I still only do a half dozen or so projects each year.
Hey there Doug, yep long time time for sure. Thanks for the input I appreciate it. I guess by "proper" you mean a box similar to Rick's?
Do you know, or can you guess, what the humidity is for you in the problem months of summer? I'm just trying to get a "feel" for how hight the humdity gets before it becomes a problem.
Maybe Pat can jump in here and shed some light on the issue.
Hi Ron, don't get me started.....hhaaahaaa ..glue chipping, the thing I'm doing more of and knowing less about ? Humidity is key in this process so I'm told........31% is ideal .....My hot box is exactly like Rick"s, and it gets 110 f / 31 -40 % h....and at times I still wait days for the chip ?...I try glue/water mix 1:1 and 1:1.5 . using preheated glue seems to be to thick......add a little water.....doesn't chip after days.....weash it off, start over....should I move to Colorado ?
Hi again Ron....it gets humid here in the summer....how humid?....your sweat won't evaporate!....seriously. I'll take notice this summer but in truth I'm really not sure. Vances isssues seem to be about the same as for me though.
With good glue, we can chip here all year. The only problem we would face in the winter is getting the garage/shop warm enough. Depending on the size, I'd put it in a plastic box or container and bring it upstairs in the warm office and put it on the light table. The piece would be chipped in a day. Noel and I call it the Rocky Mountain chip. We've never built a chipping box or booth.
Mike
Mike Jackson / co-administrator Golden Era Studios
Vintage Ornamental Clip art
Jackson Hole, WY
Hi everybody,
The best chipping I've done so far is to really watch the thickness of the glue.I put poster board strips on the sides of the artwork and use a stiff dry wall knife to sqeege the exes off.It seems to always chip great if I do that.My booth heat is 130 to 140 .8% to 11% humidity and will normally, if put in the box by 3pm be done by in the morning.1:2 glue /water.
A quick addition...Mike you made me remember...Smitty in England also used a light table ....at least for a while anywho. He seemed to like it but something tells me he's moved on to other things...anyone know what or if?
It looks as though everybody has there own method of dealing with the problem. It seems the best option is to start with the least expensive approach and work your way up until you get the required results.
I was assuming there might be some "magic range", like 40-50%, where humidity was noticed as a major factor. Obviously that's not the case.
Back to the 3 pronged approach to the problem, experiment, experiment and then experiment.
Ron ....was talking to Smitty today and he was VERY informative on this...and I'm gonna take his advice. He intends to post something regarding this so make sure you have a little paper in your printer. He's done ALOT of experiments.
thanks for following up on thist Doug, I await Dave's reply .......... someone has to know how to get more consistency with chipping. Its becoming a large part of my work and I ... well better know how to do it. When I get that nice architectual job with all the chipped/gold glass panels, I don't what to say "I hope these pieces chip".....
Yeo Guys....I too want to sort this out once and for all. For example....today I dragged out 2 3x3 ft. pieces that I started a couple of weeks ago and needed to set aside for a big pub job. Today I took them out of the "can" (a place of honour in the shop) and as usual a few stubborn spots didn't chip. Whats actually unusual is the 2 are all snail chips with just a few ferns mixed in for confusion. Smitty says he can control this and I've seen perfect chipping in factory produced stuff sold at the local stained glass studio.....ummm. It would actually be a good thing for us all to compare notes someday soon...and another ummm as he scratches his head.
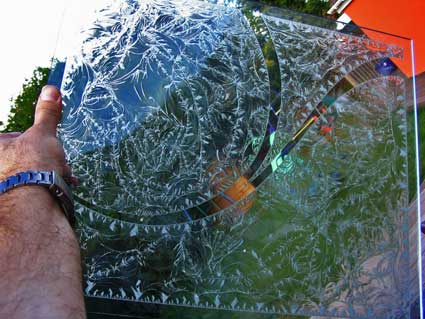
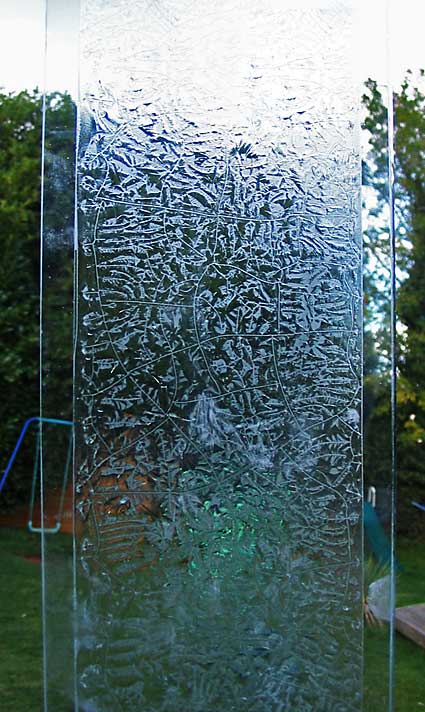
Sorry about that. I need to check in abit more often with this site.Been a bit busy here folks. My chipping is going great, I can now control what it does even though I always steer for a fern chip with just small amounts of sandblast showing. I think the key to succesful chipping is keeping the glue warm throughout the complete chipping process and not having the glue to thick on the glass. I have built a light box and placed it into my original glue chip box the same one as Rick had at Fine Gold 8,ft high and 10ft wide I have flouresent strip bulbs inside the box every 6 inches I can control the lightbox by turning on either all 19 bulbs for big work or spliting it and turning on 8 bulbs, just a electricity saving idea here thats all. The temprature in the box with the doors shut gets up to 85 degrees humidity will drop to 25% which is all you need .The idea is to get a slow chip like the fern effect you see.I sand blast the glass with virgin white alluminium oxide 220 or silicon carbide then dust off my panel with a brush this brush I keep only for this process.Now get the room your working in warm enough ,warm up your glass with a hair dryer same way as stated Pour on your glue hot or cold it does not matter! It will still work the only difference is in the flowing don't worry about it cooling to much just get it
on the glass. Now the glue is on the glass let it sit for 1 hour then place it into your lightbox upright or if you have it flat without any covering this will be fine except you will get flying glass occasionally Rick's box contains all my glue chips so I can use it over again. Now this stage is where it is drying the glue from the gelling stage. The base of the glass is against the chipping box which is giving out even heat over the glass surface . By heating the glass from the gelling stage I have had a perfect fern chip everytime. To get a snail chip just let the glass dry naturally in a cool room then once it is dry and hard place it into the lightbox for the chipping process to begin. The mix I use is 1 glue to 1.1/2 water but if you really want to flow it out 1 to 2 would be fine and does not effect the chip but get a consistant thickness for the glue level. A fan in the box would work for stubborn areas .Also when cutting the glue after geling I keep dipping in my scalpal blade into hot water so when you cut you will notice the glue flow away from the side slightly this helps preventing over chips and plinks in your work. Another way also for controling the way the chip goes is running cut lines through you glue the glue follows the cuts along the line. Even a fan can control your chipping for direction, place the fan at the side of the glass about 2 ft away have it on low and leave it on throughout the drying stage the pattern is amazing! strands of fine chipped areas flowing away from the fan ..I will post some photos up tonight for you. Goodluck!
Dave
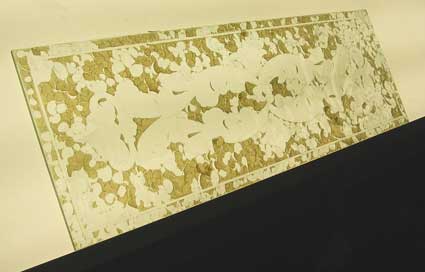
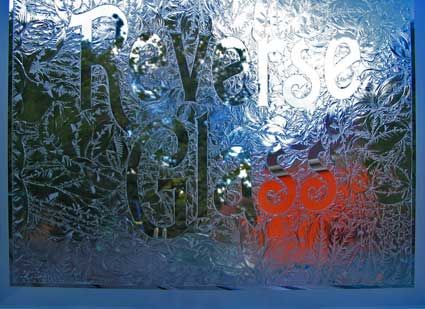
Glass chipping on fluorescent fixtures (top two).
This shows the fan effect of chipping, above.
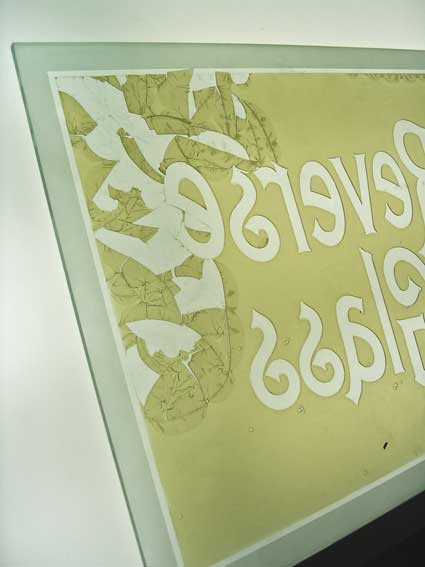
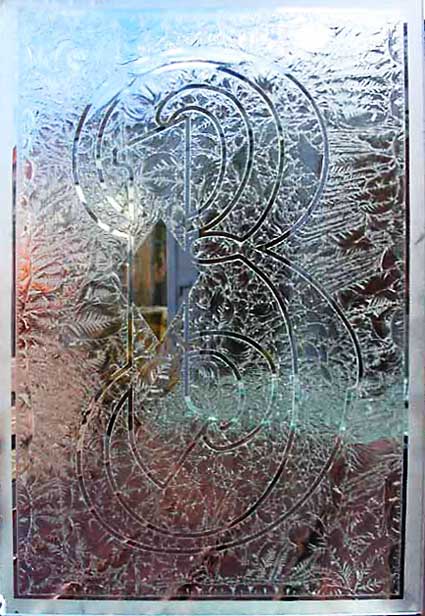
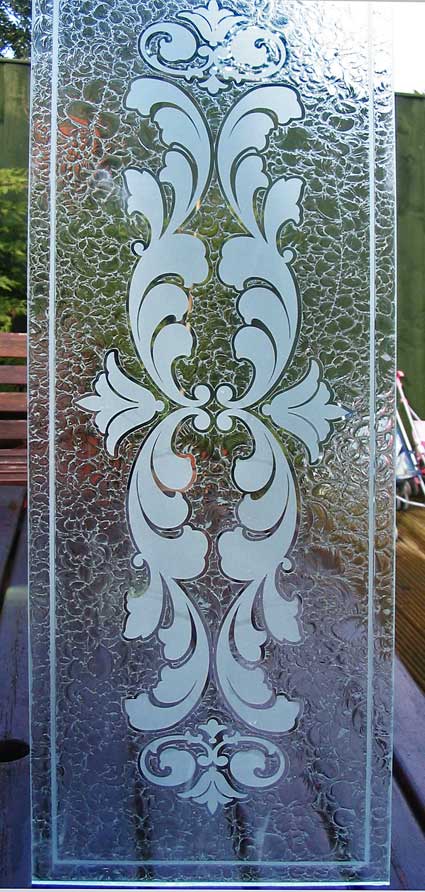
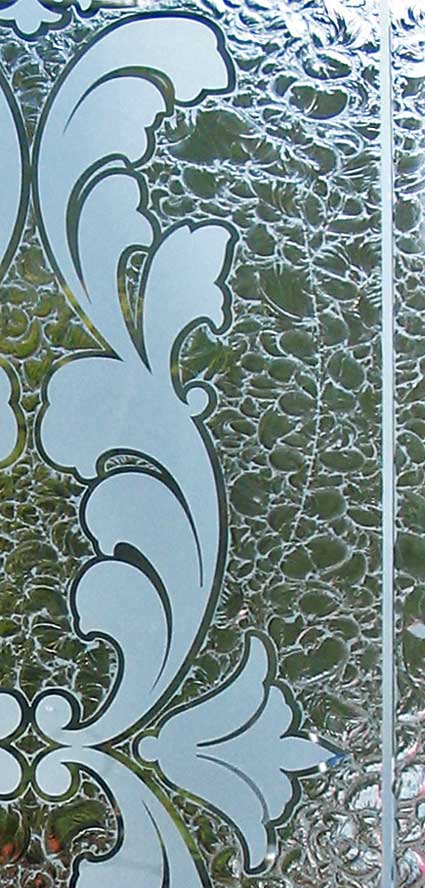
For the square chipping effect I used the glue a third time after it falling into the cabinet. I let it soak in water then re-heated it in a microwave until all the glass had gone to the bottom of the pot just leaving glue for the third chip. so the glue had got weaker through the amount of times it being used, below.
These scrolls your seeing are sandblasted at the same time as everything else then the glue is only applied to the chipping areas, below.
Great post Dave. You have made some keen odservations on the preliminary stages of applying the glue AND initial drying prior to involving heat and inducing a dehumidified environment. I believe variations of these preliminary proceedures once defined and catagorized will answer our long asked questions of how to control ferns, snailshells, oceanic, lobster claws and all the in between weird chips that occur.
I just had a vision that someday on the late news there will be a miracle of a letterhead's chipped panel found to have an image of The Virgin of Guadalupe within it, Hey, well that would be greater than on a lousy 'ol cheese sandwich, burnt Cheeto or even tree sap.... wouldn't it??
Pat
Glad to see the picture provided and to let ya all know...our buddy...Mr.Smith has found himself back in the hospital. He had an operation several weeks back to "correct" an old war wound to his knee. Seems the ... thing got infected and he is sweating it out. Also...his first concern was to make sure a few photos in regards to chipping made it on to the BB and in fact his bride Mel called me today to make sure this happened. We both agreed he is a wee bit of a "nutter" as the English would say, and that we hope he stays away from things like skiing mountains and climbing Everest on the first try in the future!!
Dave...you mention using aluminum oxide as an abrasive..and yet your silvering is sweet and clear. What about the idea of the aluminum tarnishing silver and what do you do to deal with that. Also your glue deposits seem (from photos) to be quite consistent (thickness wise) and what do you do to ensure this? Are you using the asphaltum(bitumen) process? Questions questions...uuummmm!! Also Pat....I read in the cities principal newspaper just that!!! a young local girl saw a vision of the "virgin in the rocks" while visiting a pub near the National Gallery in London several weeks ago...I await independent confirmation but you may have hit it on the head!
Last edited by Doug Bernhardt on Mon Mar 20, 2006 10:47 pm, edited 2 times in total.
This has been some very educational reading. I have been experimenting with chipping for a fwe months now with sporatic results. I live in Southeast Alabama, so you can imagine how much trouble the 95 - 105 degree weather coupled with 90% humidity will give me in the up coming Summer months. I am NOT looking forward to it.
I work in a glass company as a simple glazier, but have experimented with glass art (simple frosting) over the last 11 years and just recently have stumbled upon glue chipping while researching glass carving. I purchased my own plotter (the wife loved that one) and am hoping to learn how to make complex designs that include glue chipping combined with glass carving. The wife will have a cow if I try to use her NEW oven / stove to dry my smaller pieces like I have done in the past, so I have to make other arrangements for my upcoming chipping projects.
I obtained a well built (tight seal) glass crate that is approximately 4' x 5' and is 10" deep. I like the idea of making it a lay down chipping box. I have a few old pc cases laying around and got to thinking that the power supply and a few fans would move the air nicely, but I am not sure that simply moving the air over the glass / through the box will do much good. Also, I have thought about putting a regular 100 watt light bulb inside hooked up to a reostat to control the temperature inside. What stumps me is how do I control the humidity when I live in a humidity rich environment? Should I simply keep the box sealed and allow the fans to move the air and simply spread a liberal layer of desicate over the bottom of the crate? Purchasing a dehumidifier is not a viable option at this point since my wife will kill me if I spend any more money without making some first.
OK Now after all that hospital stuff. A year ago I had a skiing accident in France , still after a year and a re-construction of my left Cruciate Ligarment I managed to catch a skin bug infection in the knee which hospitalized me over the last weekend. I 'm Better now after all them drugs and nurses. (WON'NT BE GOING SKIING AGAIN)!. Doug I have always used Virgin White Alluminium oxide 220 with no problem to silvering ,are you using fresh mixes in your silvering? to much tin can change tones to your silvering. Stannous Chloride is vunerable to the air.If your crystals are yellow they will not be any good for tinning. White crystals give the best results. Also your deionised water content is important, general tap water will give you problems from all the inpurities it carries, yet saying that I new an old silverer in Stockport Manchester by the name of Davd Barclay he made gypsy caravan mirrors all brilliant cut and silvered he used the water from the top of his garden which was looking over and connected to one of Manchesters main canals. The water he was pumping from the canal gave him great white mirrors. I have one here in the shop and it's purfect, possibly he was getting a clean source of water in that area. The glue I deposit usually is from the sqeegy bottles I purchased from Fine Gold way back.
Leveling your glass is important and by adding more water you stand to get an even thickness to the glue layer ,but it will take longer to dry. In my first projects for chipping I was always on the phone to Rick. I was the same as him living near the coast and having to deal with all the humidity factors, Like Mike said every now and again Rick would have a new trick or formula up his sleeve and change everthing. I would then go out after talking to him and set up that new trick and formula and try the same thing. Then he would change it again. basically trial and error seems to be the main thing with chipping. At the moment my chipping is going great. You mentioned you had visited a stained glass studio and seen some consistent chipping , I have seen the same thing here consistant glue chipped fern patterns, this is done in big rooms with industrial de-humidifiers and heaters working all day, they have the room tempratures under control and sealed they no exactly what chipping they need to make usually fern. It's different for us unless you can control it like this in a smaller enviroment which can be hard. I use the Asphaltum on complicated glass designs to save all that hand cutting but on basic designs like some of the Rawson and Evans glass I would just run around the glass feeling the edge of the vinyl with the tip of my knife blade. Hope this helps a bit Doug
Joe,
For dehumidifing I use those little plastic jars called DRY OUT from home depot.There cheap and your wife might not mind that.I use about ten in my box and they work great.I have had them over a year and there only half used.
Dave,Glad your doing better!
Dave, I'm wondering if the kind of glass you're chipping makes a difference. I recently tried chipping Restoration Glass made by Schott and it worked better than anything I'd tried before. It's machine drawn - not float glass - and I think it's much "softer" than regular glass. Not all glass is the same - even clear glass.
Hi Sarah.
I definetly thinks there is a difference. On talking with Pat recently about some old signs I had bought he was explaining the difference in the glass they had used and the way they made it. I won't explain it here but hopefully Pat could step in on this subject. Also John Studden was doing a Job with Dave Mcdonald they were working on some glass at a store and noticed a difference in the way the gold and paints were taking to the glass. He said it was old glass and the key was alot better than the ordinary glass we .
Good informative post...
I don't know if it is of help to anyone, but I've used a heating pad under my glass in my shop in the winter for chipping. The temp fluctuates a lot in the draughty old garage I work in and it seems to really help the glue flow out in the cold. Without it it seems hard to get even coverage before the glue wants to set up on cool glass. I find it gives me a much more even chip.
I'm curious as to a couple of the images you posted Dave - may I email you some questions?
I believe there is no shame in failure. Rather, the shame lies in the loss of all the things that might have been, but for the fear of failure.
Your way of chipping sounds good simalar to a lightbox with consistant heat over the area. I have friend in Santa Cruz by the name of Steve Kersey his website is www.kerseyglass.com some great information on chipping on this site .He has a big room set up like I stated in my last post ,he chips all the glass for Rich Samsel of Glasslight.com he also has some wonderful work going on at Glasslight.
Dave
Hello All. My hard drive crashed- remedy= down time and BIG bucks at tax time!! Positive side-It's a rippin' monster now.
In answer to Dave's lead to different glass hardness. It is true that glass varies in hardness to the fact it will cut or glue chip differently. Just tempering regular plate glass will result in a different, more difficult chip. There is a difference in regular plate glass and the more recently available STARPHIRE or DIAMONTE which are softer and nearly water clear, due to much less iron content. Glass batch which is blown or rolled into sheets may be softer still. Pyrex is a BOROsilicate based glass, and I know it is harder to sand blast and I would not even try to glue chip it.
Older glass, like the type Rawson & Evans worked with is still around if it has avoided rocks, B-B's or an ASSasin armed with acid etching cream in a shoe polish appicator. It is beautiful, usually about 5/16" thick and appears as a glowing vaseline sea foam yellow-green when viewed on edge. The old glaziers I used to know called it "boiler plate", and I never learned how it got that name. I wish that it could be bought as new sheets now, but sadly it isn't and only becomes available if it is rescued out of old store fronts before demolition. Many old beveled glass windows are made of this old thicker glass which is why they are so beautiful. Besides the unique glow AND also because they were beveled from 5/16" thick (instead of the standard 1/4" of today) the beveling angle is steeper which pipes more refracted light into the bevels. Another fact is that they were HAND beveled which left slight facets on the beveled areas. The facets create the opalesent planes that pull the colors out of the light spectrum. A machine beveler just creates a perfect plain which fails in the EYE CANDY department.
Pat
 Denver Chapter of the Letterheads