Welcome to The Hand Lettering Forum!
This is an interactive Bulletin Board on the topics of Sign making, design, fabrication, History, old Books and of coarse Letterheads, Keepers of the craft. The Hand Lettering Forum features links to resources, sign art history, techniques, and artists profiles. Learn more about Letterheads at https://theletterheads.com. Below you'll see Mchat has been added as a live communication portal for trial, and the Main forum Links are listed below.

White Acid Panel, short step by step

Hand Lettering topics: Sign Making, Design, Fabrication, Letterheads, Sign Books.

Moderators: Ron Percell, Mike Jackson, Danny Baronian

Post Reply
DAVE SMITH
Posts: 1213
Joined: Sat Jul 10, 2004 11:12 am
Location: ENGLAND

White Acid Panel, short step by step

Post by DAVE SMITH »

This is a piece I made a few days ago showing you some short step by steps of pouring white acid onto a big area of glass. I only at to white out the bottom half of this 40''x78'' piece of glass
This was a trace of a window made in 1905 for a hotel window which recently was smashed. When Pouring into the centre like this usually gives a definate pour mark ,but because the liquid was moving nice and steady I only had a slight pour mark in the centre . My aim was to cover the pour mark centre within the design using a toned acid 1-3 for 45 minutes which worked great. I think next time I would angle the glass and pour it from the top like a curtain flowing down. I like the finish it gives to the surface ,seems far better than sandblasting.

Image
I start with Building a dam in wood strips covered in any type of vinyl, years ago they would have used tallow.
For smaller pieces I use a tray made from polypropolean which I had made. The dam you see will cotain the acid.

Image
Pouring the acid central to roughly where the design will be.

Image
The acid is now left on for one and half hours.

Image
Now its ready I make a gap in the vinyl wall tilt the glass slightly and let the acid fall into the bucket ready for next time.
You can keep using this over and over but always make a test to see if it's working correctly.

Image
Now I pour over some water and let it dissolve the layer of white scum on top of the glass.
The toned acid finish is under the scum which needs an hour or so to disolve.
Once this was dissolved I cleaned the glass and covered the whole piece in a white vinyl without joins( no overlaps) ready for my design
Image
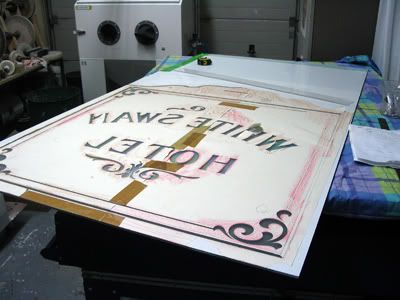
The original design was traced by the glass company . I then stuck this to the vinyl resist ready to hand cut.
Image
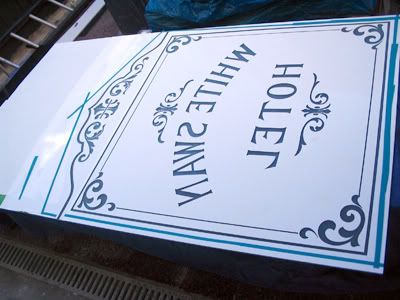
This is the glass now leveled and containing the acid within the letters and scrolls . The 1-3 acid to water concentration was left on for 45 minutes

Image
Not the most exciting of pieces but it shows a brief discription of this old process.
Just let me add here that acid is very dangerous and it does require respect so where goggles and gloves and a proper mask , also try to work with plenty of ventilation.
I usually make my pieces out side which helps. You can buy gell creams from the same company that you buy your acid from to help if you have an accident to your skin . Take your time!

I will post some more acid work next week which contains 4 tones and brilliant cutting along with some gold staining fired in the kiln.


A question for Pat and anyone else involved in this type of work . Would you say it's better to pour from the top and let it flow down over the glass or even have two people pouring to stop wave marks in the final finish?

I hope this short step by step will have helped some people and given them an insight to acid toning.
I am still learning as we all are, so any other ideas are very welcome.
Maybe even some old pictures of this process that people you know may have.

Thanks
Dave

Dave
Wayne Osborne
Posts: 165
Joined: Tue Jun 15, 2004 2:03 am
Location: West Sussex.England

Post by Wayne Osborne »

Dave- thanks for sharing that- Simple effect but fascinating to see...Drooling over old white acid windows will never be quite the same again!
Sarah King
Posts: 167
Joined: Fri Apr 09, 2004 8:43 pm
Location: Oak Park IL
Contact:

Post by Sarah King »

Dave - thanks very much for showing us the process! It sure does help to have pictures - and to see it step by step.

But I can't quite tell - are the wood strips taped to the glass itself or to a board under the glass? If they are taped to the glass itself don't you get a clear border where they block the acid? Further details would be appreciated.

I can just imagine how messy and aweful that tallow was - especially after it had gotten a little acid mixed in!
Sarah King
AngelGilding.com
DAVE SMITH
Posts: 1213
Joined: Sat Jul 10, 2004 11:12 am
Location: ENGLAND

Post by DAVE SMITH »

Hi Sarah.
I wrapped the green vinyl around the wood strips,placed them against the side of the glass then stuck strips of vinyl to the underside of the glass and brought them over the top of the wood strips and sealed them flat on the front of the glass. I then sealed the corners and cut my design about an inch inside the acid wall.The original design had an inch clear gap around the glass also.This method contained the acid well . Pat Mackle uses another interesting method for creating an acid wall, I will email him and ask him to explain what he does which I think is more of a traditonal method. I spoke with an acid chap today in London and he uses a tallow wall painted with some sort of wax ,which seals the edges preventing the acid from seeping under the wall.

Dave.
Patrick Mackle
Posts: 478
Joined: Thu Apr 08, 2004 10:21 am
Location: Monrovia, Ca.
Contact:

Post by Patrick Mackle »

Way to go Dave, looks good.
I have never used or owner a plotter. All my designs have been done by hand painting or screen printing the resist. I do possibly see a plotter in my future.
My white acid mixture described to me by Clark-Eaton Glass frosted the glass in one hour. Tilting the glass to remove it generally allowed all of the bath to return to the bucket including the soda as a milky solution. Yours appears to be quite clear as if much of the soda remained stuck in place.
My experience is to have most of the bath pour off to the bucket and then rinse away the remaining loose soda residue.
What remains is a fine even layer of etched glass residue that dissolves away with fresh water. The degree of time it takes for this residue to break down is a clue for monitoring the condition/balance of your white acid mixture. The more acidic, the more stubborn the residue, more neutral and the residue dissolves easier. Too acidic or too neutral will produce no even frost at all.
When pouring the white acid, it must go on as quick and even as possible, any pauses and the soda will settle unevenly resulting in blotchy marks in the etch. Sometimes right after pouring I will "shuffle" the panel horizontally to flow out the soda.
"Fatting up" the glass to contain the acid isn't as messy as it sounds and is quite quickly done by an experienced embosser.
I developed a way of using automotive masking tape and melted parafin wax. The idea is to contain the acid on the face of the glass. In the older days they would sometimes cut the glass larger, then trim down the panel to the desired size and eliminate the containment marks where the tallow was applied to hold the acid.
Submerging the glass panel in a tray requires that one side must be protected, and if something leaks or lifts the panel will suffer.
Also, it takes more volume to fill a bath than to contain it on the surface, also less rinsing and neutralizing the amount of rinse water before disposal.
Pat
Post Reply