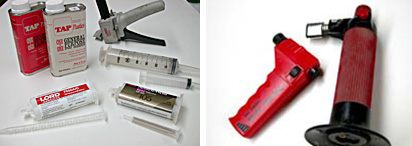
Upper Left: Supplies - from bottom left clockwise - LORD adhesives 7550 epoxy w/ nozzel, 5 minute cure, Tap plastics general purpose epoxy, 15 minute open time, 1 hour cure, cartridge application gun, 60cc hypo,12cc hypo, 3M 105 epoxy w/ nozzel, 50 ml, 5 minute cure.
Right: small hand held butane torches.
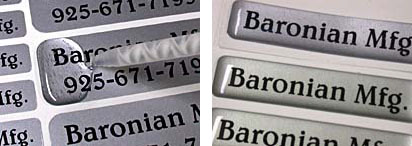
Left: applying Lord adhesive. Two component system is mixed through mixing tube. Start at one end applying epoxy within 1/32" from the edge. Apply around the permitter first, filling the center last. With practice, applying enough material will allow it to go just to the edges and stop. If air bubbles remain, carefully pass a torch over the labels about 6" from the surface. Done properly you will notice the bubbles surface and pop.
When heating the labels to eliminate bubbles, have someone else help and use the torch or heat gun on completed labels while you apply the epoxy when using 5 minute epoxy. Otherwise you'll find by the time you've finished applying epoxy, any remaining bubbles will be firmly set.
Right: top label is Lord adhesive's water clear epoxy, bottom is Tap's epoxy which has an amber tint.
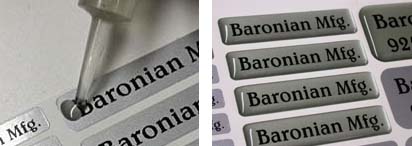
Left: applying Tap epoxy with a 12cc plastic hypo. Mix equal amounts of A and B, stirring thoroughly. At this point, the mixed liquid will have thousands of bubbles. Let sit for 2-3 minutes and many will dissipate.
Right: labels domed, cured and ready for application. When finished hypo and other tools can be cleaned with Acetone.
The labels were edge printed then weeded. Labels supplied from a source in Wyoming (thanks Mike).
The Tap epoxy worked the best and is the most economical. The only draw back is it's slight amber color vs. Lord and 3M brands that are clear. Lord adhesives and 3M worked much the same, are convenient but cost more
at $ 12.85 for a 50 ml tube. The drawback with LORD and 3M is the 5 minute cure time. 3M makes a 10, 15 and 30 minute cure. A 15 or 30 minute cure would be preferable to 5 minutes.
Next time I'd use 3M two part clear epoxy similar to Tap's epoxy with a 15 minute clear, rather than the cartridges, using the re-useable plastic hypos to apply. The mixing tips for the 3M and Lord adhesives are in the $ 1.00 range, while a 12cc hypo cost approximately $ 1.50 which can be cleaned with acetone and be re-used.
The labels on the lower right are 3/8" high x 1 3/4" long, and would take approximately 1 to 1 1/2 - 50 ml tubes to dome decales on a 8 x 10 sheet.
 Denver Chapter of the Letterheads