Adhering a printed image to glass: Help. I have never paid attention to various letters and hints I have seen regarding the affixing of a printed picture to the reverse side of glass: I gernerally have preferred to attempt it by handpainting, screening or by changing the design to avoid the pictorial. Whew! That's my true confessions out of the way. NOW I have the need to mount some nickle-sized human faces within a gold job--and the only way I will can acheive a likeness is to glue on an illustration. With apologies to those whose techinical articles I have heretofore ignored, what is the best procedure?
Ink jet or Laser? Gloss paper? How can I anticipate / guarantee lightfastness? What kind of adhesive?
Thanks,
Mark Oatis
Welcome to The Hand Lettering Forum!
This is an interactive Bulletin Board on the topics of Sign making, design, fabrication, History, old Books and of coarse Letterheads, Keepers of the craft. The Hand Lettering Forum features links to resources, sign art history, techniques, and artists profiles. Learn more about Letterheads at https://theletterheads.com. Below you'll see Mchat has been added as a live communication portal for trial, and the Main forum Links are listed below.
This is an interactive Bulletin Board on the topics of Sign making, design, fabrication, History, old Books and of coarse Letterheads, Keepers of the craft. The Hand Lettering Forum features links to resources, sign art history, techniques, and artists profiles. Learn more about Letterheads at https://theletterheads.com. Below you'll see Mchat has been added as a live communication portal for trial, and the Main forum Links are listed below.
Mounting a paper image / reverse glass.
Moderators: Ron Percell, Mike Jackson, Danny Baronian
-
Tony Segale
- Posts: 702
- Joined: Thu Apr 08, 2004 10:20 am
Mark...
In a workshop with Frances Binnington, we 'decopauged' newsprint into the glass with elmers glue and water.
I've been wanting to test this with some acrylic paintings, but have not as of yet.
I wouldn't with watercolors, but I plan on testing gouache this way as well.
If you get a chance, send me an email .... tonysegale@comcast.net
and he took that golden hair and made a sweater for baby bear.
http://www.tonysegale.com
http://www.tonysegale.wordpress.com
http://www.tonysegale.com
http://www.tonysegale.wordpress.com
-
Kelly Thorson
- Posts: 502
- Joined: Tue Apr 20, 2004 11:53 pm
- Location: Penzance, SK Canada
- Contact:
When we took Bill Heug's advanced gold leaf on glass class at Aliento we adhered Giclee prints to the glass using spar varnish. The prints were sprayed with an aerosol spar varnish and allowed to dry (in order to minimize the chance of bleeding or moving the ink I believe) and then once they were dry we used liquid spar varnish to glue them to the glass. Because of the prints tendency to curl upwards we had the glass in a stand with the side we were adhering the print to down and worked the varnish outwards with our fingers. They were left to dry for a couple of weeks before shipping, although they seemed to set up in a day.
I believe there is no shame in failure. Rather, the shame lies in the loss of all the things that might have been, but for the fear of failure.
-
John Studden
- Posts: 150
- Joined: Wed Jul 28, 2004 11:40 am
Mark, I have tried different glues, one we mixed at Rick's was I think a mixture of mucilage & spar varnish, seemed to work well, this was coating both surfaces then applying & working out the bubbles, letting it dry upside down to keep your eye on it, the only trouble is with bigger jobs it can develop an air bubble when you are not paying attention, Also it will lose the color & turn clear, restore the look with a coat of white paint on the back.
For smaller jobs just get a laser print laminated both sides, cut it bigger & tape around the edges....looks just as good & can be replaced if need be when fading occurs. this method has worked well for me.................less chance of any varnish crystalizing etc.
For smaller jobs just get a laser print laminated both sides, cut it bigger & tape around the edges....looks just as good & can be replaced if need be when fading occurs. this method has worked well for me.................less chance of any varnish crystalizing etc.
John Studden
Valencia Signs, California
Valencia Signs, California
-
Doug Bernhardt
- Posts: 1077
- Joined: Fri Apr 09, 2004 9:29 am
- Location: Ottawa Canada
- Contact:
Hi Mark, I use the old 1/3 1/3 and 1/3 mixture (Damar, resin gel and quick rubbing) although I also changed from quick rubbing to the bulletin spar at the "Bosses" suggestion. It was a good one. I've done this many times with canvas but only once with a digital print.....that was several years ago and all five of them are A-Okay. It all went something like....When I got the print from the copy house they had put a laminate over it. After a good cleaning I put the mixture on BOTH surfaces (glass and print) and plopped it into place. Used a squeege to remove the air bubbles and excess varnish, and left a bead of mixture at the edges to dry. I differ from most in that I leave the work face down as I have had problems with it in the opposite. This mixture is also amazing in that you can tool/emboss away with in just a few minutes and water gild the next day. Bon Chance!!
-
Kent Smith
- Posts: 569
- Joined: Fri Dec 31, 2004 6:41 pm
- Location: Estes Park, CO
- Contact:
I have used all the methods mentioned before with mixed success. Inkjet images seem to last about 2 to 3 years depending upon UV. The damar mix seems to help with eliminating curl. Muscilage or acacia gum is water based so it will attack inkjet unless clearcoated first. I have had good luck precoating prints with either UV clear acrylic or white shellac before applying. Once cleared I have used white quick rubbing, WW Spar, gold size, venice Japan, and UV cure resin. I also use a rubber brayer to smooth out the bubbles. Most recent experiments are with UV resistant Thermal prints...too early to tell.
-
DAVE SMITH
- Posts: 1213
- Joined: Sat Jul 10, 2004 11:12 am
- Location: ENGLAND
Hello Mark
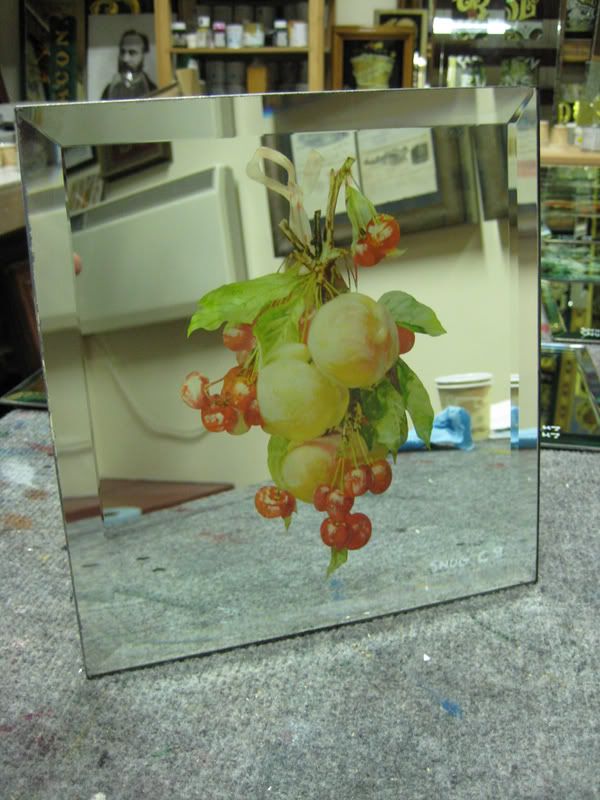
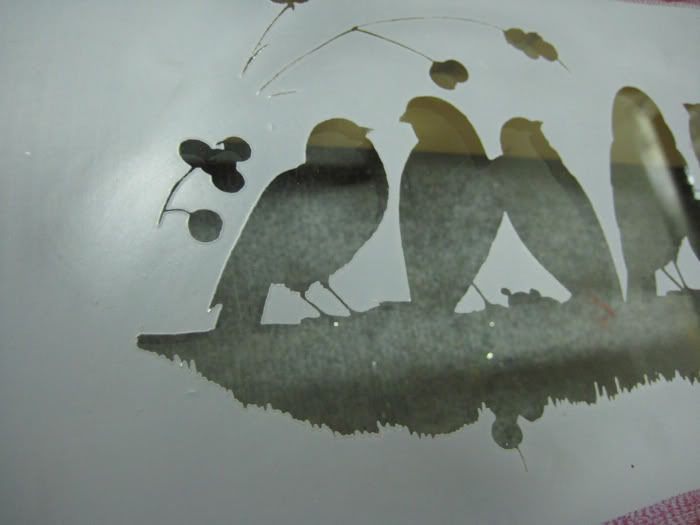
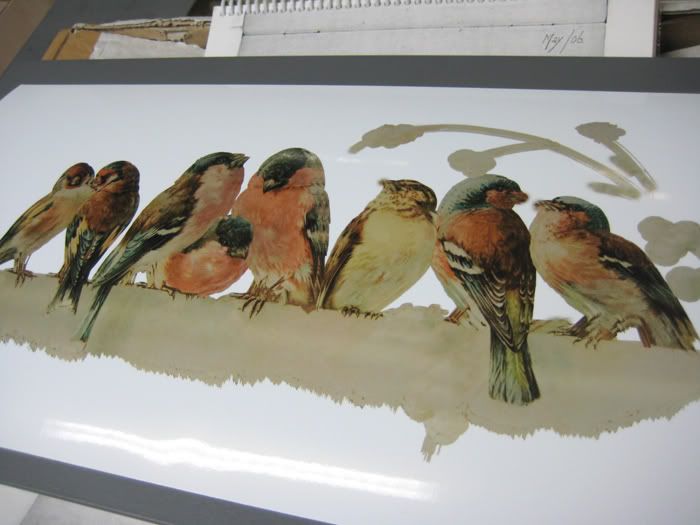
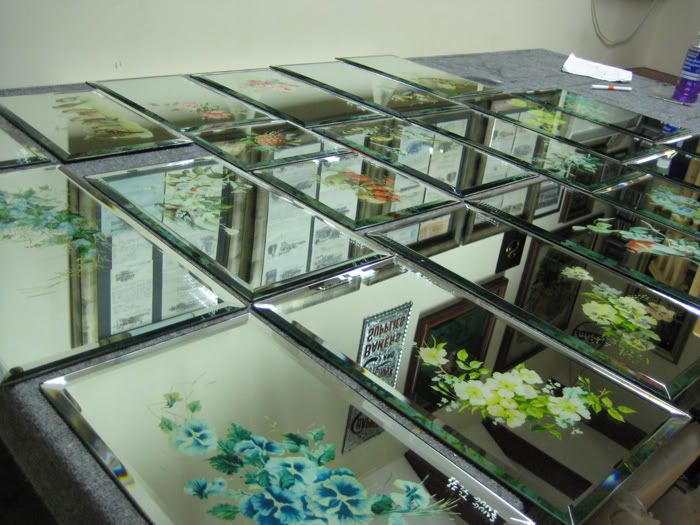
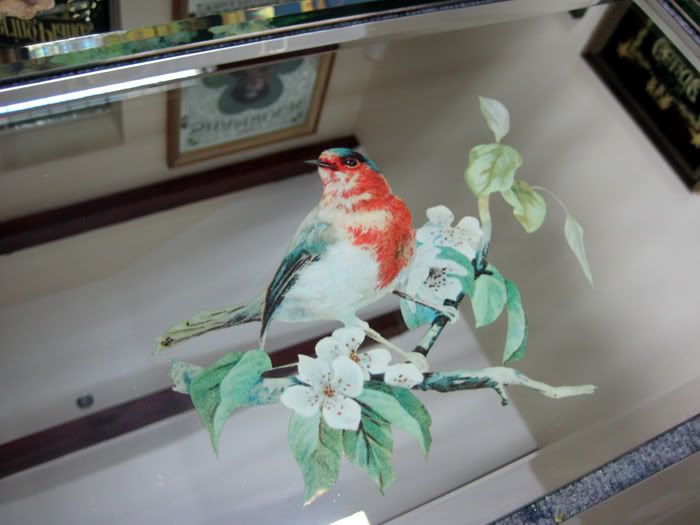
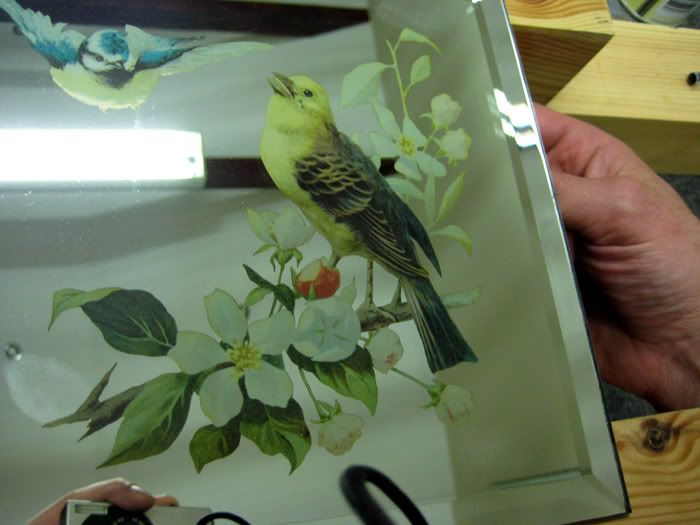
I had recent job consiting of 62 victorian bird , fruit and flower images to apply to glass. I made tests with different varnishes and found that cuprinol yaught varnish worked best for open time and hardness once dried completely. I applied the images as John said above and removed as much varnish as possible leaving a very thin layer between the glass and print. The designs went behind a 3 coated silvered deposit and mirror backing paint along with shellac backup. I made a test about 6 months previous so its really hard to tell what will happen here ,It may yellow as most varnishes do but that depends on how much is left on the glass . My test peice is looking good but i personally think waterslide transfer techniques are the way to go ,my time limit on this job was not there for endless testing. These panels are in a dark area of a pub so at least that is on my side .They are printed on Epson uv lightfast paper premium gloss which they give a 100 year life for and the inks used are for archival print jobs (they better work).I uesd Photoshop to get tight registration for the final open area. I flattened the paper out and also bent them upward to help the natural curling to take place. wire wool was also ued for flattening out ridges around the clear area from build up of the paint .They came out looking old and original and matched the pub work very nicely. I don't want to do them again so everyone pray for me!
Hope this can help somehow.
Dave
removing varnish
-
erik winkler
- Posts: 1097
- Joined: Sat Feb 23, 2008 5:48 pm
- Location: Amsterdam Netherlands
- Contact:
As often is: Good answers give even more questions...
If i interpreted these texts and photo's the pictures are glued on the reverse side of the glass.
But how do you apply the silvering? Is it done with a mask and then later the mask is removed?
Did anybody tried outsourcing the pictural designs to a signmaker which has an vutek (or other brand) flatbed printer?
(Outsourcing, because i do not have the machine)
These glass prints should be baked in a kiln and then the result will be like ancient church windows and the colors will almost stay there for ever.
I want to try this combination (printing, silvering and mybe some glueing), in two months time.
But does anybody know what kilning/baking the glass will do to the surface of the glass if i want to chip it afterwords?
Because i have the idea that the best planning this work would be:
1. printing
2. baking
3. chipping
4. silvering
Or am i completely wrong?
Realizing we are in the 2nd renaissance of the arts.
Learn, copy and trying to improve...
Still in the learning phase
Amsterdam Netherlands
www.ferrywinkler.nl
www.schitterend.eu
www.facebook.com/Schitterend.eu
Learn, copy and trying to improve...
Still in the learning phase
Amsterdam Netherlands
www.ferrywinkler.nl
www.schitterend.eu
www.facebook.com/Schitterend.eu
-
DAVE SMITH
- Posts: 1213
- Joined: Sat Jul 10, 2004 11:12 am
- Location: ENGLAND
 Denver Chapter of the Letterheads