If you've ever wanted to dome dimensional letters, here's a quick, inexpensive way to begin.
As with any technique you do for the first time, cut several extra letters or shapes, and use those as a test.
You'll need a plastic refillable bottle, the type used in restaurant's for ketchup, which can be purchased at Smart and Final. A 4-6 pack of empty bottles cost about $ 4.
Stir stick: anything to stir up the epoxy with. I use tongue depressors purchased at Tap Plastics in a box for $ 8. These are great for stirring in a dixie cup, and a box will last for years.
Epoxy - a general purpose 1 to 1 epoxy. Here on the west coast we have a chain of stores called Tap Plastics which carries casting supplies, plastic, adhesives, and fiberglass supplies. When I need large quantities I purchase wholesale through supply houses that specialize in modeling and casting supplies. From Tap a can of A and B will cost around $ 14 for 1/2 pint of material of each.
Several sign mags advertise epoxy for doming, the price is $ 99 a quart. Tap sells the same material for $ 30 a quart. Purchased at a modeling / casting supply house will cost about $ 40 - 50 a gallon.
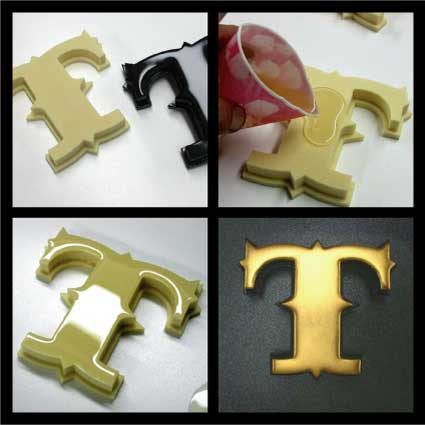
Photo upper left: raw HDU cut out letter on the right, duplicate letter on the right domed and painted black.
Use a piece of wood large enough to hold all the letters you'll be doming, taking care make sure it's level. When pouring on start 1/8" from the edge, continuing around the permitter until you have a continuous enclose bead of epoxy, then begin filling in the center, taking care to make sure you don't add so much liquid it spills over the edge. If the epoxy does not go all the way to the edge, take a tongue depressor, nozzle of the bottle or popsicle stick and nudge the epoxy toward the edge. With practice, you can easily fill letters in without having to nudge the epoxy. I used a dixie cup rather than a dispenser since I only had three letters to do.
Epoxy may also be tinted or colored by the addition of epoxy colorants, enamel, lacquer or universal tinting colors. No water based paints. If you do add color, add a little to both A and B stirring the color into both individually, then again by adding the A and B together. Bronzing powders can be added to clear epoxy, mixing at a ratio of 1.5 metal powder to 1 part epoxy.
Upper right: This letter is 5" tall, and required about 1/10th of an ounce of combined A and B. Carefully measure out equal amounts of each - 1:1, and stir well, then stir some more. Mixing the two together will produce hundreds of air bubbles, let the cup sit for a minute or two before you pour onto the letter.
Open time for mixed epoxy is 10 - 15 minutes, mix and use only what can be easily be dispensed in that time. After application if bubbles are visible, they can be lightly misted with isopropyl alcohol or use of a propane torch. Carefully, and quickly pass the torch over the letters. If using a torch, start farther back and adjust distance until you see the bubbles dissipate. Get the torch too close and you might want some marshmallows nearby, though the fumes many not make for good tasting somemore's. Properly done the bubbles will rise to the surface and pop.
If you're doing a quantity of letters, fill the bottle half full. With the bottle upright, squeeze as much air out as possible without dispensing any liquid, invert the bottle, hold the bottom and let the bottle suck in air, equalizing the pressure. The liquid can then be dispensed onto the letters. As long as you don't turn the bottle right side up, you can move from one letter to another without the epoxy dripping out. If you need to set it down, set it down nozzle first into a heavy cup.
Lower left: applied epoxy, no bubbles, edge to edge fill. Tip: if you want know the epoxy is dry, squeeze out a small amount on the board. Touch this spot rather than a letter. Epoxy should set up in about an hour at 60 - 70 degrees, longer at lower temperatures. Clean up with acetone.
Lower right: HDU letter, epoxy domed painted black and gilded.
 Denver Chapter of the Letterheads