I chipped 2 pieces at the same time, same glue mixture. One piece chipped perfectly, no problems. The other piece chipped perfectly also, except for in a couple of small isolated areas. The glue is as hard as the glass and stuck as if it's part of the glass. I'm guess I'm going to soak it off with some wet paper towels and try chipping these small areas again.
Anyway, I would like to know what might have caused this for future reference.
Thanks,
Jerry
Welcome to The Hand Lettering Forum!
This is an interactive Bulletin Board on the topics of Sign making, design, fabrication, History, old Books and of coarse Letterheads, Keepers of the craft. The Hand Lettering Forum features links to resources, sign art history, techniques, and artists profiles. Learn more about Letterheads at https://theletterheads.com. Below you'll see Mchat has been added as a live communication portal for trial, and the Main forum Links are listed below.
This is an interactive Bulletin Board on the topics of Sign making, design, fabrication, History, old Books and of coarse Letterheads, Keepers of the craft. The Hand Lettering Forum features links to resources, sign art history, techniques, and artists profiles. Learn more about Letterheads at https://theletterheads.com. Below you'll see Mchat has been added as a live communication portal for trial, and the Main forum Links are listed below.
chipping question
Moderators: Ron Percell, Mike Jackson, Danny Baronian
-
Jerry Berg
- Posts: 369
- Joined: Wed May 02, 2007 3:17 pm
- Location: pacific northwest
-
Roderick Treece
- Posts: 1086
- Joined: Sat Apr 10, 2004 8:04 pm
- Location: San deigo Calif
- Contact:
Re: chipping question
Jerry,
Post a photo of it. Chances are all you need to do is take an exacto an pop them off. Now your starting to figiure out one thing about chipping, you never figiure it out.I'm just happy when it does it.Lately all I get is these tight linear chips.
Good luck
Post a photo of it. Chances are all you need to do is take an exacto an pop them off. Now your starting to figiure out one thing about chipping, you never figiure it out.I'm just happy when it does it.Lately all I get is these tight linear chips.
Good luck
-
Jerry Berg
- Posts: 369
- Joined: Wed May 02, 2007 3:17 pm
- Location: pacific northwest
Re: chipping question
Here's a pic. An exacto won't work because there's nothing to pry under, it's as hard as a rock. Everthing on both pieces chip fairly fast without a hitch except for a couple of stubborn places. These places are 1/2" wide x a few inches tall.
 [/img]
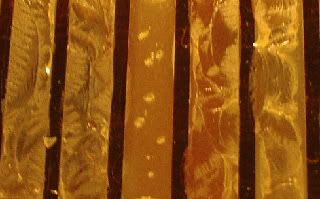
-
Rob Schramm
- Posts: 76
- Joined: Sun Mar 22, 2009 11:38 pm
- Location: Spring Valley, Illinois
- Contact:
Re: chipping question
Ok I dont know alot about glue chipping but I do know some about hide glue from repairing antiques and you should be able to soak the area in warm water and it will loosen it. Well at least it should and since it is glass it will not hurt to do that.
ʎɐqǝ uo pɹɐoqʎǝʞ ɐ ʎnq ı ǝɯıʇ ʇsɐן ǝɥʇ sı sıɥʇ
-
Roderick Treece
- Posts: 1086
- Joined: Sat Apr 10, 2004 8:04 pm
- Location: San deigo Calif
- Contact:
Re: chipping question
Jerry,
I take it those little specks in the glue are where you stabed it with the exacato? If it isn't then try to pock it quickly and see if it frachers.If not I'd say you may have poured that section to thick.It may require soaking it off and redoing it again.Live and learn.
Roderick
I take it those little specks in the glue are where you stabed it with the exacato? If it isn't then try to pock it quickly and see if it frachers.If not I'd say you may have poured that section to thick.It may require soaking it off and redoing it again.Live and learn.
Roderick
-
Jerry Berg
- Posts: 369
- Joined: Wed May 02, 2007 3:17 pm
- Location: pacific northwest
Re: chipping question
Roderick,
You're right, thats where I stabbed it! Anyway I figured it was too thick in that area. Time to re-chip. Live and learn, thats what it's all about.
Thanks for the reply,
Jerry
You're right, thats where I stabbed it! Anyway I figured it was too thick in that area. Time to re-chip. Live and learn, thats what it's all about.
Thanks for the reply,
Jerry
-
Danny Baronian
- Site Admin
- Posts: 638
- Joined: Wed Apr 07, 2004 2:16 am
- Contact:
Re: chipping question
Jerry, have you had any sun up in your area lately? If so, place the glass a couple of 2 x 4's in the sun, keep an eye on it and see if that helps.
Danny
Danny
-
Roderick Treece
- Posts: 1086
- Joined: Sat Apr 10, 2004 8:04 pm
- Location: San deigo Calif
- Contact:
Re: chipping question
Danny's right, If you have time it looked like it was pulling away alittle on the sides.Get it hot and dry and it might still chip.
-
Mike Jackson
- Site Admin
- Posts: 1705
- Joined: Tue Apr 06, 2004 11:02 pm
- Location: Jackson Hole, WY
- Contact:
Re: chipping question
Just a couple of add-ons:
IF you gave it long enough, and IF it is warm/hot and dry, you'd probably still get it to chip. We had one test piece with a stubborn area back in Oklahoma. Since it was only a test piece, I didn't try to clean it off and redo any of it. Then, in the middle of the summer, I heard a "plink". Sure enough, it chipped, but maybe six months later.
You can also build a little "dehydration chamber" for a small area by putting a few spacer blocks of wood, maybe 1/2" thick, under a small piece of glass that covers the area. Before adding the glass, sprinkle in a generous supply of silica gel, then add the glass and tape the glass down with duct tape.
If the glue still won't chip, soften the glue with water, remove it, then paint asphaltum around the spot. It will already be frosted. Pour some new glue over the exposed area and let it dry and chip. Asphaltum is only necessary if the unchipped portion is up against clear glass. Otherwise, just pour some new glue over the spot and let it go again.
Mike Jackson / co-administrator
Golden Era Studios
Vintage Ornamental Clip art
Jackson Hole, WY
Photography site:
Teton Images
Jackson Hole photography blog:
Best of the Tetons
Golden Era Studios
Vintage Ornamental Clip art
Jackson Hole, WY
Photography site:
Teton Images
Jackson Hole photography blog:
Best of the Tetons
-
Jerry Berg
- Posts: 369
- Joined: Wed May 02, 2007 3:17 pm
- Location: pacific northwest
Re: chipping question
Thanks for the respones guys.
Sun? Ha, we have'nt seen any of that since last year, maybe 7 months ago. I don't think the temperature has been above 53 degrees either. I had this in the chipping box all day yesterday and into the night.
I removed the glue this morning, touched it up and re-glued... all before 5am. I really don't recall the glue too thick in any areas but it's most likely the problem I'm supposing. I did find an awesome glue dispensor though that really works great, especially for very tight areas with fine detail as there where some on these pieces.
Jerry
-
Steven Vigeant
- Posts: 55
- Joined: Fri Jun 04, 2004 12:07 am
- Contact:
Re: chipping question
Does someone know what are the specs for a chipping booth? Temp & air flow should be what? to optimally chip in about how long, 2 days? Can you live without it? My aforementioned pieces are still doing nada during our recent cool days.
Thanks, Steve
Thanks, Steve
-
DAVE SMITH
- Posts: 1213
- Joined: Sat Jul 10, 2004 11:12 am
- Location: ENGLAND
Re: chipping question
Jerry. You really just need a light table for succesful chipping. Stagger tubes every 5 inches inside an old or new light table with perspex and glass over the face.
Sandblast your glass 220 grit brush off the excess with a paint brush but keep this for only this process and nothing else. You could also wash off the dust and let it dry as there is no difference. mix your glue and test that your heating it to a maximum temp 150. Pour it on making sure the glass is level place it on the light box over paper cups say 2 and 1/2'' off the surface for 3 hours this keeps it warm which helps for fern chipping ,take the cups away and leave it. Then watch 10 hours later and you will get some cool chipped glass.follow this procedure everytime and you won'nt ever get a problem again. This gives a fern chip to the glass ,if you want a snail chip just prevent the glue from drying as long as possible. The humidity on your table will be around 25-35% temp 90-100dgs. do a test piece and show us how it looks. apply the glue evenly not too thick and not to thin. If you apply thin you will notice texture close to the glass like orange peel at that stage it is drying just add some more glue with an old signwriting pencil to build the thickness up.
good luck
Dave
-
Robert Schwieger
- Posts: 123
- Joined: Wed Feb 07, 2007 12:38 pm
- Location: Nebraska
Re: chipping question
I am curious about the glue dispenser that Jerry found. Can you share this information? Thanks. Bob
-
Danny Baronian
- Site Admin
- Posts: 638
- Joined: Wed Apr 07, 2004 2:16 am
- Contact:
Re: chipping question
Steve,
here's what no one else had said (unless Vance slipped something in ) Start over.
Watching your progress first hand, the first problem was the mask detaching during sandblasting, the second trying to make it work - and not start over, and finally applying the glue thinly and rushing too much. This is an observation, not criticism . The work you have can't be done in 2 hours. Unless you're Larry. He's had lots of practice. And way too much time on his hands.
Advice from someone that has tried to correct mistakes too many times, only to realize: the best - and fastest way to correct major mistakes - is from the beginning.
Detailed chipping information is posted both on the forum and The Letterheads tab at the top of the page.
If you're under a deadline consider acid embossing. Clean the glass, apply the mask, apply the mica acid and 30 minutes later move on to the next phase. No, it's not the same look as glue chipping but nice look in a shorter time. If you need the chipped glass, once the mask has been applied and given a light frost, apply the glue, let the glue harden, stand in a corner and it should be ready to go in a day or so.
Rob, can't speak for Jerry, but imagine the dispenser is similar to the attached image, available from Sarah at http://angelgilding.com/
Danny
here's what no one else had said (unless Vance slipped something in
Watching your progress first hand, the first problem was the mask detaching during sandblasting, the second trying to make it work - and not start over, and finally applying the glue thinly and rushing too much. This is an observation, not criticism . The work you have can't be done in 2 hours. Unless you're Larry. He's had lots of practice. And way too much time on his hands.
Advice from someone that has tried to correct mistakes too many times, only to realize: the best - and fastest way to correct major mistakes - is from the beginning.
Detailed chipping information is posted both on the forum and The Letterheads tab at the top of the page.
If you're under a deadline consider acid embossing. Clean the glass, apply the mask, apply the mica acid and 30 minutes later move on to the next phase. No, it's not the same look as glue chipping but nice look in a shorter time. If you need the chipped glass, once the mask has been applied and given a light frost, apply the glue, let the glue harden, stand in a corner and it should be ready to go in a day or so.
Rob, can't speak for Jerry, but imagine the dispenser is similar to the attached image, available from Sarah at http://angelgilding.com/
Danny
- Attachments
-
- Glue Dispenser.gif (2.52 KiB) Viewed 44575 times
-
Larry White
- Posts: 1213
- Joined: Thu Apr 08, 2004 4:18 am
Re: chipping question
Schofe-
If ya want to bring your piece by, I'll give it my best evaluation on what to do.
-WB
If ya want to bring your piece by, I'll give it my best evaluation on what to do.
-WB
-
Jerry Berg
- Posts: 369
- Joined: Wed May 02, 2007 3:17 pm
- Location: pacific northwest
Re: chipping question
Dave, I'll give your method a try. It's very rainy and humid here though. I would have to be careful about glass getting around the area too. I will definately give this a shot.
I believe the problem I had with the glue not chipping in a certain area was due to the glue being too thin in that area. I ended up removing the glue and doing it over in that area and even applying more glue to boot on top off that. I don't know why but I had the glue twice as thick there to make it chip, which it finally did.
Robert, I have a number of glue bottles and have one like the one Danny pictured. The one I made mention of is a medium sized plastic medical syringe with a curved angled tip that gets very narrow at the tip. It worked excellent for applying the glue in very tight fine areas.
-
Danny Baronian
- Site Admin
- Posts: 638
- Joined: Wed Apr 07, 2004 2:16 am
- Contact:
Re: chipping question
In addition to the glue dispenser, I believe Sarah will be selling tips that fit onto the pictured dispenser, as Rick used to carry. The tip has an opening of approx 1/32".
The tip is slipped over the nozzle of the dispenser in order to apply glue in small areas.
Danny
The tip is slipped over the nozzle of the dispenser in order to apply glue in small areas.
Danny
-
Sarah King
- Posts: 167
- Joined: Fri Apr 09, 2004 8:43 pm
- Location: Oak Park IL
- Contact:
Re: chipping question
Thanks, Danny. We have been working on putting togther a bunch of glue chipping supplies including bottles. They aren't on the website yet but we have them in stock. We also have pint size glue pots (and quarts) from Hold-Heet. So phone if you're interested because it seems to take us awhile to jump through all the hoops necessary to post new items on our website.
Dave, I tried your light table idea and I had no luck with it. What size and type of bulbs are you using? Could you maybe post a photo of the insides of it? It's a great idea because I use a light table for stained glass so it would be a dual purpose tool - but my glass on the light table chipped at the same rate as the glass on my bench -which is to say that after 2 days I gave up and up it under a plastic tent with my dehumdifier shere it chipped overnight.
Dave, I tried your light table idea and I had no luck with it. What size and type of bulbs are you using? Could you maybe post a photo of the insides of it? It's a great idea because I use a light table for stained glass so it would be a dual purpose tool - but my glass on the light table chipped at the same rate as the glass on my bench -which is to say that after 2 days I gave up and up it under a plastic tent with my dehumdifier shere it chipped overnight.
Sarah King
AngelGilding.com
AngelGilding.com
-
Robare M. Novou
- Posts: 424
- Joined: Thu May 06, 2004 11:18 am
- Location: Milwaukee
- Contact:
Re: chipping question
Dave, are those Bulbs High Output or Standard Ouput?
RMN
RMN
-
DAVE SMITH
- Posts: 1213
- Joined: Sat Jul 10, 2004 11:12 am
- Location: ENGLAND
Re: chipping question
Robare. Yes standard 8ft flourecent bulbs about 4 to 5 inches apart. The light table is 5'' in height I have drilled holes in the alluminiun surround to let some of the heat out.
It's the only way I personally have found that gives me succseful chipping everytime without areas unchipped. It also gives consistant even chipping to the glass.
Sarah did you allow the glue to sit above on the cups before lowering the glass? or did you let the glue dry and then place it on the light table?
It's not possible to open the light box I have so much material around it ,it is simple to make up. I ordered mine from a signcase supplier all ready made just had to plug it in and away you go.
Dave
-
Sarah King
- Posts: 167
- Joined: Fri Apr 09, 2004 8:43 pm
- Location: Oak Park IL
- Contact:
Re: chipping question
That's probably the difference. I make mine out of plywood and 4 foot long single bulb flourescent ceiling lights. I bet the aluminum body on yours really holds the heat. I think I'll have to stick with my small, roll-away dehumidifier for now.
Sarah King
AngelGilding.com
AngelGilding.com
Re: chipping question
I have a question. Does the glue adhere to the frosted glass any better when it's hot than cold? As the glue in the dispenser cools, and application to the glass continues, will the chip patterns change?
-
DAVE SMITH
- Posts: 1213
- Joined: Sat Jul 10, 2004 11:12 am
- Location: ENGLAND
Re: chipping question
Mike.
You need it hot to help it flow, if it it is cold it probably will block the end of the nozzle before you can even get it on the glass. I always use it
hot for my own method and it probably does stick to the glass better.not sure on what other peoples methods are.
Dave
You need it hot to help it flow, if it it is cold it probably will block the end of the nozzle before you can even get it on the glass. I always use it
hot for my own method and it probably does stick to the glass better.not sure on what other peoples methods are.
Dave
 Denver Chapter of the Letterheads